|
| |
รู้จัก ASP.Net SignalR วิธีการรับ-ส่งข้อมูลแบบ Real Time - VB.Net,C# |
รู้จัก ASP.Net SignalR วิธีการรับ-ส่งข้อมูลแบบ Real Time - VB.Net,C# สำหรับ SignalR จากที่ได้ใช้งานหลายบางโปรเจค แอดมินต้องยอมรับว่าเป็น Library ที่ออกแบบได้สุดยอดมากเพราะมันจุดประกายไอเดียในการพัฒนา Web Application ขึ้นมามากมาย ด้วยวิธีการพัฒนาเทคโนโลยี่และขอบเขตของการพัฒนาเว็บไซต์ใรูปแบบเดิม โดยการติดต่อสื่อสารข้อมูลระหว่าง Server กับ Client แบบ "Real time" ทันทีทันใด โดยไม่ต้องมีการ Refresh หน้าจอ และ Library กับรูปแบบการใช้งานง่ายมาก โปรแกรมมีขนาดเล็ก เขาและทำงานใช้ Resource น้อยมาก ฉะนั้น Performance ของโปรแกรมที่ออกมายอมรับได้เลยว่าดีมากๆ
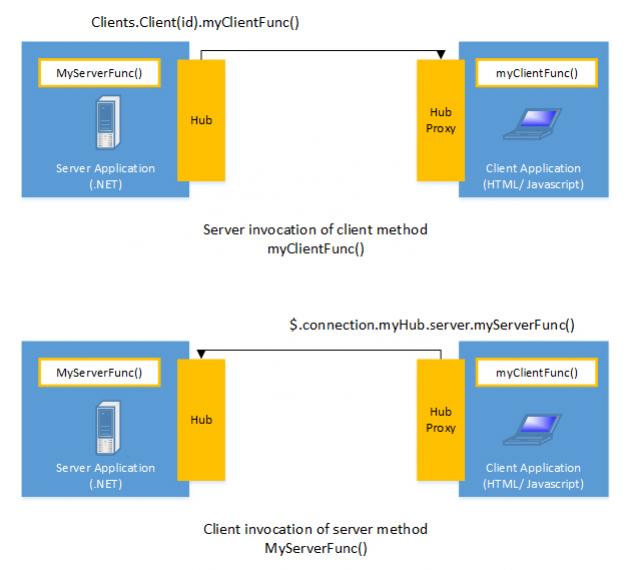
โดยรูปแบบการทำงานของ SignalR คือ ฝั่ง Web Server จะมี Hub และ Hub Proxy ทำงานอยู่ตลอดเวลา ซึ่ง Hub นี้จะทำหน้าที่รอรับข้อมูลจาก Client ที่ส่งมา และส่งข้อความทันทีทันใดไปยังทุกๆ Client ที่ทำการเชื่อมต่อในขณะนั้นๆ โดยที่ไคลเอนท์ไม่ต้อง Refresh หน้าบราวเซอร์เพื่อส่งคำสั่งมาร้องขออีกครั้งถึงจะได้ข้อมูลที่ต้องการและไม่ได้เป็นการทำงานแบบ Asynchronize
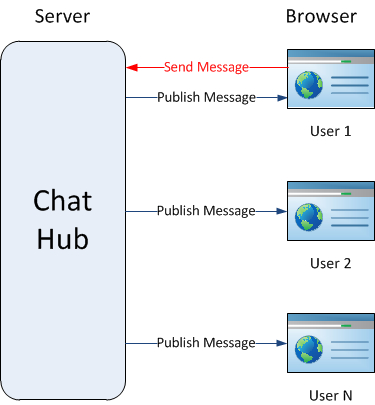 รูปแบบการทำงานของ Hub Server ที่รับส่งข้อมูลระหว่าง Server กับ Client
SignalR ช่วยลดความยุ่งจากในการเขียนโปรแกรมแบบ Real Time ซึ่งโดยปกติแล้ว เราจะต้องใช้พวก function ของ setTimeOut ทำงานร่วมกับ jQuery และ Ajax ต่างๆ เพื่อให้ได้ข้อมูลแบบ Real Time และหลายๆ สาเหตุการทำงานเป็น Loop เพื่อให้ได้ข้อมูลแบบ Real Time ทำให้เกิดการทำงานที่ซ้ำๆ เกิด Request ขึ้นมากมาย ซึ่งเป็นสาเหตุและเหตุผลหลักของการทำงานหนักของ Server และ Performance ที่ได้คอนข้างจะต่ำมาก
SignalR ยังมีควาสามารถที่รองรับการอัพเดทข้อมูลที่มีปรมิมาณความถี่ที่สูงจากเซิร์ฟเวอร์ที่ส่งมายังไคลเอนท์ได้ เช่นแอพลิเคชั่นประเภทเกมส์ต่างๆ
SignalR นำเสนอไลบรารี่ง่ายๆมาให้เราใช้ด้วยการสร้าง Remote Procedure Call (RPC) ระหว่าง Client และ Server โดยในฝั่งบราวเซอร์หรือไคลเอนท์นั้นก็จะใช้ Java Script เรียกไปยังแอพลิเคั่นเซิร์ฟเวอร์ผ่านทาง Server Side .NET Code นั่นเอง ซึ่ง SignalR นั้นยังเตรียมเรื่องของการบริการเชื่อมต่อและการส่งข้อมูลไปแบบกลุ่มมาให้ได้ใช้กันด้วย
ในรูปด้านล่างแสดงถึงส่วนประกอบของ ASP.NET SignalR โดยที่ทางฝั่งเซิร์ฟเวอร์จะติดต่อผ่านสิ่งที่เรียกว่า Hub และ Hub Proxy ตามลำดับ
ตัวอย่างการใช้ SignalR กับ ASP.Net ในบทความนี้จะใช้การสร้าง ASP.Net แบบ Web Application แบบง่ายๆ

ขั้นแรกให้สร้าง Project แบบ ASP.Net Web Application หรือ ASP.Net Web Site

โปรเจคที่ได้ ให้สร้างไฟล์ Web Form (.aspx) เปล่าๆ ขึ้นมา 1 ไฟล์
Step 1 : ให้เพิ่มไฟล์ SignalR Hub Class

ในที่นี่ตั้งชื่อว่า MyChatHub.cs

หลังจากที่เพิ่มไฟล์ SignalR Hub Class เรียบร้อยแล้ว โปรแกรมจะ Install ตัว package ต่างๆ ของ SignalR มาให้ เช่น Library ใน Reference รวมทั้งโฟเดอร์ Scripts ที่ประกอบด้วยไฟล์ jQuery และ SignalR

ในกรณีที่ Library ต่างๆ ไม่ได้ถูกติดตั้ง ให้ทำการ Install แบบ Manual ด้วยการไปที่เมนู
Tool -> Nuget Package Manager -> Package Manager Console

Install ด้วยคำสั่ง
install-package Microsoft.AspNet.SignalR

ในกรณีที่ติดตั้ง Microsoft.AspNet.SignalR แบบ Manual
Step 2 : ให้เพิ่มไฟล์ OWIN Startup class

ให้ตั้งชื่อไฟล์ว่า Startup.cs ซึ่งไฟล์ Startup นี้จะทำงานเพื่อรัน Service ของ Hub เมื่อโปแกรมทำงานขึ้น

ไฟล์ Startup.cs

โดยเพิ่มคำสั่ง app.MapSignalR(); เพื่อกำหนดว่าเมื่อโปรแกรม Startup เริ่มทำงานขึ้นให้เรียกชุดคำสั่งของ Hub SignalR ขึ้นมาทำงาน
Startup.cs
using System;
using System.Threading.Tasks;
using Microsoft.Owin;
using Owin;

[assembly: OwinStartup(typeof(myWebApplication.Startup))]

namespace myWebApplication
{
    public class Startup
    {
        public void Configuration(IAppBuilder app)
        {
            app.MapSignalR();
        }
    }
}
Step 3 : เพิ่ม Method ในไฟล์ Hub Class เพื่อใช้สำหรับการ รับ-ส่ง ข้อความระหว่าง Client กับ Server
MyChatHub.cs
using System;
using System.Collections.Generic;
using System.Linq;
using System.Web;
using Microsoft.AspNet.SignalR;

namespace myWebApplication
{
    public class MyChatHub : Hub
    {
        public void MyChatSend(string name, string to, string message)
        {
            // Call the broadcastMessage method to update clients.
            Clients.All.broadcastMessage(name, to, message);
        }
    }
}
จาก Method นี้จะเห็นว่าเป็นเพียงคำสั่งง่าย ๆ ที่รับข้อความ name และ message จากนั้นส่งมันไปยังทุก ๆ Client
Step 4 : เพิ่มไฟล์ใน HTML หรือ Web Form ใช้สำหรับ รับ-ส่ง ค่าจาก Server ซึ่งไฟล์ HTML นี้จะต้องตรวจสอบ Path ของ jQuery และ SignalR ทีเ่ป็น JavaScript Library ให้ตรงกับ Version ที่อยุ่ในโฟเดอร์ Scripts ด้วย
myWebForm.aspx
<%@ Page Language="C#" AutoEventWireup="true" CodeBehind="myWebForm.aspx.cs" Inherits="myWebApplication.myWebForm" %>
<!DOCTYPE html>
<html>
<head>
<title>SignalR Simple Chat</title>
<style type="text/css">
.container {
background-color: #99CCFF;
border: thick solid #808080;
padding: 20px;
margin: 20px;
}
</style>
</head>
<body>
<div class="container">
<div id="yourname"></div>
<input type="hidden" id="displayname" />
<input type="text" id="message" />
<input type="button" id="sendmessage" value="Send" />
<ul id="discussion"></ul>
</div>
<!--Script references. -->
<!--Reference the jQuery library. -->
<script src="Scripts/jquery-1.10.2.min.js" "></script>
<!--Reference the SignalR library. -->
<script src="/Scripts/jquery.signalR-2.2.1.js"></script>
<!--Reference the autogenerated SignalR hub script. -->
<script src="/signalr/hubs"></script>
<!--Add script to update the page and send messages.-->
<script type="text/javascript">
$(function () {
// Declare a proxy to reference the hub.
var chat = $.connection.myChatHub;
// Create a function that the hub can call to broadcast messages.
chat.client.broadcastMessage = function (name, message) {
// Html encode display name and message.
var encodedName = $('<div />').text(name).html();
var encodedMsg = $('<div />').text(message).html();
// Add the message to the page.
$('#discussion').append('<li><strong>' + encodedName
+ '</strong>: ' + encodedMsg + '</li>');
};
// Get the user name and store it to prepend to messages.
$('#displayname').val(prompt('Enter your name:', ''));
$('#yourname').html('Your name = ' + $('#displayname').val());
// Set initial focus to message input box.
$('#message').focus();
// Start the connection.
            $.connection.hub.start().done(function () {
                $('#sendmessage').click(function () {
                    // Call the Send method on the hub.
                    chat.server.myChatSend($('#displayname').val(), $('#message').val());
                    // Clear text box and reset focus for next comment.
                    $('#message').val('').focus();
                });
            });
});
</script>
</body>
</html>
คำอธิบาย
var chat = $.connection.myChatHub;
เป็นการเรียก Hub Method ที่อยู่บน Server

จะสังเกตุว่าตัวอักษรตัวแปร กรณีที่ Method เป็นตัวพิมพ์ใหญ่ ในส่วนของ JavaScript อักษรตัวแรกจะต้องเป็นตัวพิมพ์เล็ก
// Create a function that the hub can call to broadcast messages.
chat.client.broadcastMessage = function (name, message) {
// Html encode display name and message.
var encodedName = $('<div />').text(name).html();
var encodedMsg = $('<div />').text(message).html();
// Add the message to the page.
$('#discussion').append('<li><strong>' + encodedName
+ '</strong>: ' + encodedMsg + '</li>');
};
ในส่วนนี้จะเป็น function ที่เป็น callback รับข้อมูลจาก Hub Server ซึ่งจะสังเกตุว่าจะมี argument เท่ากับ method ของ MyChatSend
$.connection.hub.start().done(function () {
$('#sendmessage').click(function () {
// Call the Send method on the hub.
chat.server.myChatSend($('#displayname').val(), $('#message').val());
// Clear text box and reset focus for next comment.
$('#message').val('').focus();
});
});
ในส่วนนี้จะเป็นการส่งข้อมูลไปยัง Hub Server จะสังเกตุว่า Method ที่ call จะชื่อเดียวกับ Method ที่อยู่บน Server

จะเห็ว่ากรณีที่ตัวแแรกเป็นตัวพิมพ์ใหญ่ ในไฟล์ JavaScript ตัวแรกจะต้องกำหนดเป็นตัวพิมพ์เล็ก
สรุปไฟล์นี้ประกอบด้วย 3 ส่วนคือ
var chat = $.connection.myChatHub; // เชื่อมต่อ Hub Server
chat.client.broadcastMessage = function (name, message) { // รับค่า Callback จาก Hub Server
chat.server.myChatSend($('#displayname').val(), $('#message').val()); // ส่งค่าไปยัง Hub Server
ทดสอบการทำงาน ให้เปิด Web Browser ขึ้นมา 3 หน้าจอ ซึ่ง Script ที่ยกตัวอย่างนี้ จะมี Prompt Dialog ขึ้นมาเพื่อรับ Input ชื่อ แล้วจัดเก็บลงในตัวแปร Hidden

หน้าจอแรกให้ชื่อ win

หน้าจอสองให้ชื่อ max

หน้าจอสามให้ชื่อ tookta

ย่อหน้าจอทั้งสามให้เพื่อให้เห็นผลลัพธ์ชัดเจน

ทดสอบพิมพ์เพื่อส่งข้อความในหน้าจอใดหน้าจอหนึ่ง

จะเห็นว่าข้อความจะถูกส่งไปยังหน้าจอทั้งสาม (Client) ที่เรียก Page นี้ทันทีแบบ Real Time ในทันที

ทดสอบส่งข้อความอื่นๆ ข้อความจะถุกส่งไปยัง Client และแสดงผลตามคำสั่ง JavaScript ที่เราได้เขียนขึ้น
การส่งข้อความแบบเจาะจง Client จากตัวอย่างแรกจะเห็นว่าข้อความจะมีการส่งไปยังทุก ๆ Client ที่ทำการเชื่อมต่อกับหน้า Web Page ซึ่งในการใช้งานจริง เราสามารถสร้างเงื่อนไขว่าข้อความนั้น ๆ จะให้แสดงผลเฉพาะหน้าจอ Client ใดบ้าง ตาามเงื่อนไขที่กำหนดขึ้น

เช่น สามารถระบุชื่อคนที่จะรับข้อความได้
        public void MyChatSend(string name, string to, string message)
        {
            // Call the broadcastMessage method to update clients.
            Clients.All.broadcastMessage(name, to, message);
        }
ใน Method ของ MyChatSend เพิ่ม argument ชื่อว่า to
// Create a function that the hub can call to broadcast messages.
chat.client.broadcastMessage = function (name, to, message) {
// Html encode display name and message.
if (to == $('#displayname').val()) {
var encodedName = $('<div />').text(name).html();
var encodedMsg = $('<div />').text(message).html();
// Add the message to the page.
$('#discussion').append('<li><strong>' + encodedName
+ '</strong>: ' + encodedMsg + '</li>');
}
};
ในส่วนของ Callback เราก็เพียงรับค่า to และเช็คว่าตรงกับ Client ที่ต้องการแสดงผลหรือไม่
            $.connection.hub.start().done(function () {
                $('#sendmessage').click(function () {
                    // Call the Send method on the hub.
                    chat.server.myChatSend($('#displayname').val(), $('#to').val(), $('#message').val());
                    // Clear text box and reset focus for next comment.
                    $('#message').val('').focus();
                });
            });
ในส่วนของการส่งข้อความจะมีส่งค่า to ไปด้วย
Code เต็มๆ
MyChatHub.cs
using System;
using System.Collections.Generic;
using System.Linq;
using System.Web;
using Microsoft.AspNet.SignalR;

namespace myWebApplication
{
    public class MyChatHub : Hub
    {
        public void MyChatSend(string name, string to, string message)
        {
            // Call the broadcastMessage method to update clients.
            Clients.All.broadcastMessage(name, to, message);
        }
    }
}
myWebForm.aspx
<%@ Page Language="C#" AutoEventWireup="true" CodeBehind="myWebForm.aspx.cs" Inherits="myWebApplication.myWebForm" %>
<!DOCTYPE html>
<html>
<head>
<title>SignalR Simple Chat</title>
<style type="text/css">
.container {
background-color: #99CCFF;
border: thick solid #808080;
padding: 20px;
margin: 20px;
}
</style>
</head>
<body>
<div class="container">
<div id="yourname"></div>
<input type="hidden" id="displayname" />
Send to <input type="text" id="to" size="5" /> Message <input type="text" id="message" />
<input type="button" id="sendmessage" value="Send" />
<ul id="discussion"></ul>
</div>
<!--Script references. -->
<!--Reference the jQuery library. -->
<script src="Scripts/jquery-1.10.2.min.js" "></script>
<!--Reference the SignalR library. -->
<script src="/Scripts/jquery.signalR-2.2.1.js"></script>
<!--Reference the autogenerated SignalR hub script. -->
<script src="/signalr/hubs"></script>
<!--Add script to update the page and send messages.-->
<script type="text/javascript">
$(function () {
// Declare a proxy to reference the hub.
var chat = $.connection.myChatHub;
// Create a function that the hub can call to broadcast messages.
chat.client.broadcastMessage = function (name, to, message) {
// Html encode display name and message.
if (to == $('#displayname').val()) {
var encodedName = $('<div />').text(name).html();
var encodedMsg = $('<div />').text(message).html();
// Add the message to the page.
$('#discussion').append('<li><strong>' + encodedName
+ '</strong>: ' + encodedMsg + '</li>');
}
};
// Get the user name and store it to prepend to messages.
$('#displayname').val(prompt('Enter your name:', ''));
$('#yourname').html('Your name = ' + $('#displayname').val());
// Set initial focus to message input box.
$('#message').focus();
// Start the connection.
$.connection.hub.start().done(function () {
$('#sendmessage').click(function () {
// Call the Send method on the hub.
chat.server.myChatSend($('#displayname').val(), $('#to').val(), $('#message').val());
// Clear text box and reset focus for next comment.
$('#message').val('').focus();
});
});
});
</script>
</body>
</html>
ทดสอบการทำงาน

เปิดหน้าจอขึ้นมาสามหน้าโดยกำหนดชื่อให้เป็น win, max และ tookta

ทดสอบส่งข้อความโดยการกำหนดช่อง to ไปให้ตรงกับ User ที่ต้องการรับ ข้อความถูกส่งไปยัง Client ที่ชื่อตรงกับ to

ข้อความถูกส่งไปยัง Client ที่ชื่อตรงกับ to
สรุป SignalR เป็น Library ที่ช่วยในการรับส่งข้อมูลระหว่าง Client ไปยัง Server และ Server ไปยัง Client แบบ Real Time ให้มีประสิทธิภาพ ซึ่งเหมาะจะนำไปใช้กับ Application ประเภทที่ต้องการข้อมูลทันทีทันใด เช่น Chat , Notification หรือพวกโปรแกรมต่างๆ ที่ไม่ต้องการให้มีการกด Refresh เมื่อต้องการข้อมูลจาก Server
Code สำหรับ VB.Net
Startup.vb (VB.NET)
Imports System.Threading.Tasks
Imports Microsoft.Owin
Imports Owin

<Assembly: OwinStartup(GetType(myWebApplication.Startup))>

Namespace myWebApplication
	Public Class Startup
		Public Sub Configuration(app As IAppBuilder)
			app.MapSignalR()
		End Sub
	End Class
End Namespace
MyChatHub.vb (VB.NET)
Imports System.Collections.Generic
Imports System.Linq
Imports System.Web
Imports Microsoft.AspNet.SignalR

Namespace myWebApplication
	Public Class MyChatHub
		Inherits Hub
		Public Sub MyChatSend(name As String, [to] As String, message As String)
			' Call the broadcastMessage method to update clients.
			Clients.All.broadcastMessage(name, [to], message)
		End Sub
	End Class
End Namespace
Download file
.
| |
|
|
|
|
 |
|
|
| |
By : |
TC Admin
|
| |
Article : |
บทความเป็นการเขียนโดยสมาชิก หากมีปัญหาเรื่องลิขสิทธิ์ กรุณาแจ้งให้ทาง webmaster ทราบด้วยครับ |
| |
Score Rating : |
 |
| |
Create Date : |
2017-01-12 |
| |
Download : |
No files |
|
|
|

|