|
|
C# (.Net) Open Excel Template and Create Font,Border,Color,Style (Office 2003,2007,2010) |
|
|
| |
C# Open Excel Template and Create Font/Border/Color/Style ตัวอย่างการใช้ C# ในการเปิดไฟล์ Excel ที่มีอยู่ และทำการสร้างเป็น Excel ชุดใหม่ โดยตกแต่งข้อความ เช่น สี , ขนาด ของ ฟอนต์
C# Generate Excel
จากบทความ
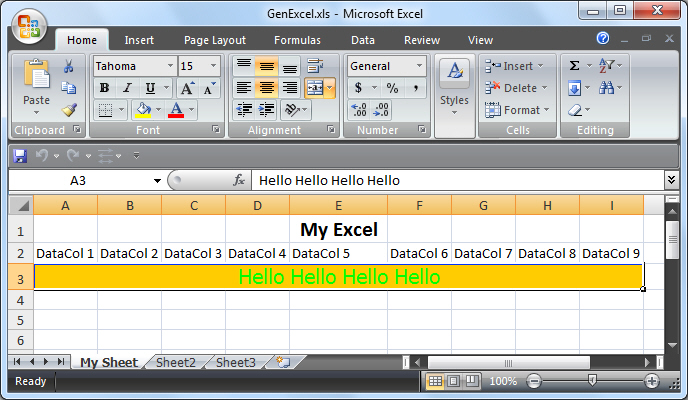
บทความนี้จะเป็นการเปิด Excel ที่มีอยู่ และทำการเขียนข้อความลงใน Excel และทำการ Save เป็นไฟล์ใหม่ โดยมีการเพิ่ม ตกแต่งเพิ่มเติม เช่น
xlWorkSheet.get_Range("A3", "I3").Font.Name = "Tahoma";
xlWorkSheet.get_Range("A3", "I3").Font.Size = "15";
// xlWorkSheet.get_Range("A3", "I3").HorizontalAlignment = 4;
xlWorkSheet.get_Range("A3", "I3").VerticalAlignment = -4108;
xlWorkSheet.get_Range("A3", "I3").HorizontalAlignment = -4108;
xlWorkSheet.get_Range("A3", "I3").Interior.ColorIndex = 44;
xlWorkSheet.get_Range("A3", "I3").Font.ColorIndex = 4;
xlWorkSheet.get_Range("A3", "I3").Font.Italic = true;
สำหรับการใช้งาน Property อื่น ๆ สามารถอ่านได้จากบทความ ASP.NET + Excel
Go to : ASP.NET Write Excel Style and Format (Excel Application)
Go to : ASP.NET Excel.Application
C# กับ Excel
เริ่มต้นด้วยการ Add Reference ตัว Library ชื่อ Microsoft Excel 12.0 Object Library หรือ Version อื่น ๆ ที่ได้ติดตั้งลงในเครื่อง (Office Excel)
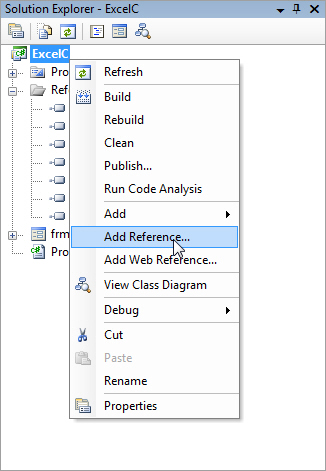
คลิกขวาที่ Project เลือก Add Reference
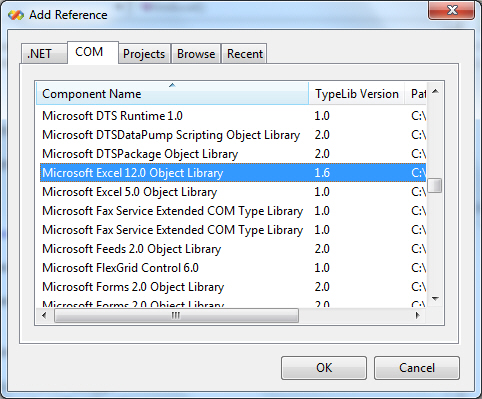
เลือก Microsoft Excel 12.0 Object Library เหมือนในรูป
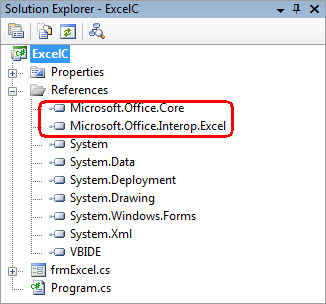
เพิ่มเติม สำหรับ Excel 2010 ให้ใช้ Microsoft Excel 14.0 Object Library
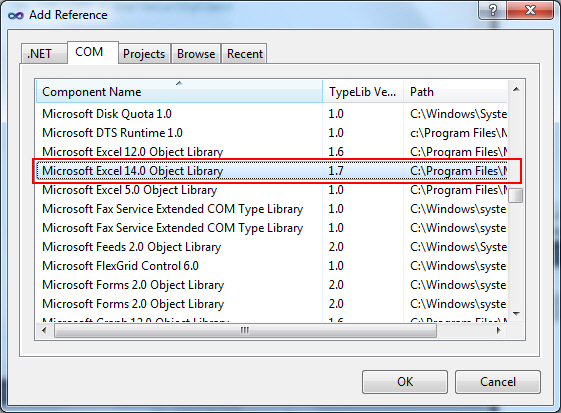
Library ถูก Add ลงเรียบร้อยแล้ว
ตัวอย่าง Code ของภาษา C#
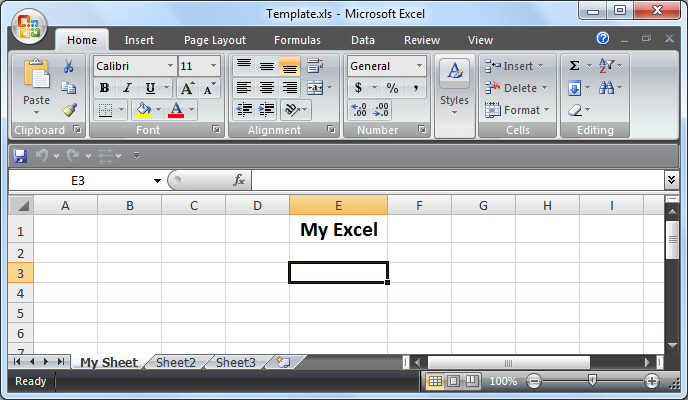
ไฟล์ต้นฉบับ
frmExcel.cs
using System;
using System.Collections.Generic;
using System.ComponentModel;
using System.Data;
using System.Drawing;
using System.Text;
using System.Windows.Forms;
using System.IO;
using Excel = Microsoft.Office.Interop.Excel;

namespace ExcelC
{
    public partial class frmExcel : Form
    {
        public frmExcel()
        {
            InitializeComponent();
        }

        private void btnExcel_Click(object sender, EventArgs e)
        {
            Excel.Application xlApp;
            Excel.Workbook xlWorkBook;
            Excel.Worksheet xlWorkSheet;
            object mis = Type.Missing;
            string strTemplate = "C:\\ExcelC\\Xls\\Template.xls";
            string strFileName = "C:\\ExcelC\\Xls\\GenExcel.xls";

            xlApp = new Excel.ApplicationClass();
            //xlApp = new Excel.Application();
            xlWorkBook = xlApp.Workbooks.Open(strTemplate, 0, true, 5, "", "", true, Microsoft.Office.Interop.Excel.XlPlatform.xlWindows, "\t", false, false, 0, true, 1, 0);

            xlWorkSheet = (Excel.Worksheet)xlWorkBook.Worksheets.get_Item(1);
            xlWorkSheet.Name = "My Sheet";

            xlWorkSheet.Cells[2, 1] = "DataCol 1";
            xlWorkSheet.Cells[2, 2] = "DataCol 2";
            xlWorkSheet.Cells[2, 3] = "DataCol 3";
            xlWorkSheet.Cells[2, 4] = "DataCol 4";
            xlWorkSheet.Cells[2, 5] = "DataCol 5";
            xlWorkSheet.Cells[2, 6] = "DataCol 6";
            xlWorkSheet.Cells[2, 7] = "DataCol 7";
            xlWorkSheet.Cells[2, 8] = "DataCol 8";
            xlWorkSheet.Cells[2, 9] = "DataCol 9";

            xlWorkSheet.get_Range("A3", "I3").Merge(true);
            xlWorkSheet.get_Range("A3", "I3").BorderAround(Excel.XlLineStyle.xlContinuous, Excel.XlBorderWeight.xlMedium, Excel.XlColorIndex.xlColorIndexAutomatic, Excel.XlColorIndex.xlColorIndexAutomatic);
            xlWorkSheet.get_Range("A3", "I3").Font.Name = "Tahoma";
            xlWorkSheet.get_Range("A3", "I3").Font.Size = "15";
           // xlWorkSheet.get_Range("A3", "I3").HorizontalAlignment = 4;
            xlWorkSheet.get_Range("A3", "I3").VerticalAlignment = -4108;
            xlWorkSheet.get_Range("A3", "I3").HorizontalAlignment = -4108;
            xlWorkSheet.get_Range("A3", "I3").Interior.ColorIndex = 44;
            xlWorkSheet.get_Range("A3", "I3").Font.ColorIndex = 4;
            xlWorkSheet.get_Range("A3", "I3").Font.Italic = true;

            xlWorkSheet.Cells[3, 1] = "Hello Hello Hello Hello";

            xlWorkBook.SaveAs(strFileName,
                mis, mis, mis, mis, mis, Excel.XlSaveAsAccessMode.xlExclusive, mis, mis, mis, mis, mis);
            xlWorkBook.Close(true, mis, mis);
            xlApp.Quit();

            System.Runtime.InteropServices.Marshal.ReleaseComObject(xlApp);
            System.Runtime.InteropServices.Marshal.ReleaseComObject(xlWorkBook);
            System.Runtime.InteropServices.Marshal.ReleaseComObject(xlWorkSheet);

            xlApp = null;
            xlWorkBook = null;
            xlWorkSheet = null;
            GC.Collect();

            MessageBox.Show("Generate Successfully");

        }

    }
}
Screenshot
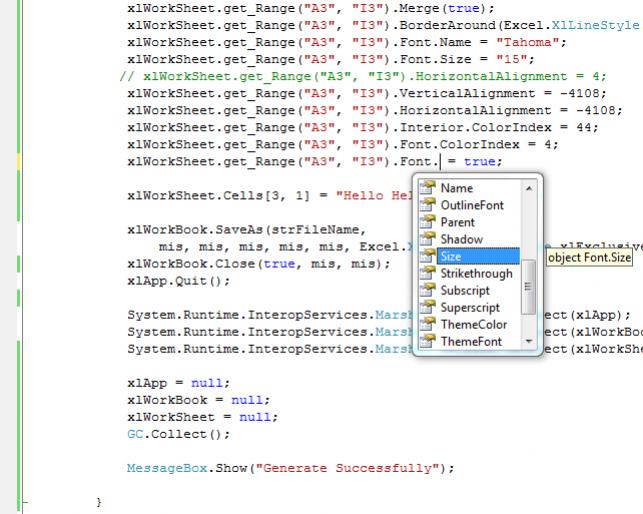
เทคนิคในการเขียนโปรแกรม ถ้าหากเราได้พัฒนาโปรแกรมบน Visual Studio ค่าต่าง ๆ ที่เป็น Property จะแสดงในส่วนของ Auto Complete ซึ่งจะช่วยให้การเขียนโปรแกรมง่ายและสะดวกเป็นอย่างมาก
| |
|
|
|
 |
|
|
|
| |
|
|
|
|
|
|
| |
By : |
TC Admin
|
| |
Score Rating : |
- |
| |
Create Date : |
2011-09-07 16:44:51 |
| |
Download : |
No files |
| |
|
|
|
|