Windows Phone 8 and Azure Table Storage (Windows Azure) |
Windows Phone 8 and Azure Table Storage (Windows Azure) สำหรับ Table ให้จินตนาการถึงฐานข้อมูลประเภท MySQL หรือ SQL Server เพียงแต่ Database จะถูกทำงานในรูปแบบ Online และเรียกใช้งานจากที่ไหนก็ได้ ที่ผ่านระบบ Internet โดยที่เราไม่ต้องลงทุนตั้ง Server และติดตั้งโปรแกรมอื่น ๆ ที่จะรองรับการทำงานร่วมกับ Windows Phone และไม่ต้องออกแบบช่องทางที่ไว้สำหรับเป็นช่องทางการสื่อสาร เพราะ API ที่จะเรียกใช้งานได้มีการออกแบบมาตรฐานและรูปแบบ ไว้ที่เมีความปลอดภัยในการใช้งาน รับ-ส่งข้อมูล
ในบทความหัวข้อนี้จะเป็นการเขียน Windows Phone กับ Windows Azure Table Storage กับการจัดเก็บข้อมูลแบบ Table ที่ประกอบด้วย Column และ Rows ลงบน Storage โดยจะยกตัวอย่างการ Insert ข้อมูลไปจัดเก็บใน Table ไว้บน Storage การเรียกใช้และอ่านข้อมูลใน Table รวมทั้งการ Update และ Delete ข้อมูลใน Table ที่อยู่บน Storage ของ Windows Azure
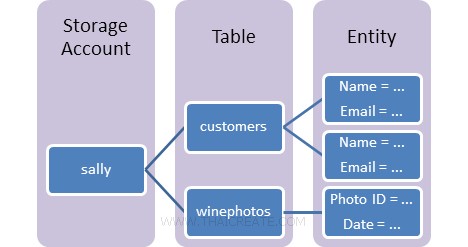 โครงสร้างของ Table จะแบ่งเป็นขั้นลำดับคือ Account -> Table -> Entity (ซึ่งข้อมูลจะถูกจัดเก็บไว้ที่นี่)
การติดตั้ง Library API : Windows Phone 8 and Windows Azure Storage
ขั้นตอนการเเขียน Windows Phone กับ Table (Windows Azure Storage) ในขั้นแรกสุดเราหลังจากที่เราสร้าง Services ของ Storage บน Azure Portal Management เรียบร้อยแล้ว คือจะต้องสร้าง Table (เปรียบเหมือนตารางไว้จัดเก็บข้อมูล)
เรียกใช้ Class ของ Azure Storage
using Microsoft.WindowsAzure.Storage;
using Microsoft.WindowsAzure.Storage.Auth;
using Microsoft.WindowsAzure.Storage.Table;
สิ่งที่จะต้องเตรียมคือ Account และ API Key
DefaultEndpointsProtocol=https;AccountName=[yourAccount];AccountKey=[yourKey]
สร้าง Connection สำหรับการเชื่อมต่อ
// Create the connectionstring
String StorageConnectionString = "DefaultEndpointsProtocol=https;AccountName=[yourAccount];AccountKey=[yourKey]";
ทำการเชื่อมต่อไปยัง Azure Storage
// Retrieve storage account from connection string.
 CloudStorageAccount storageAccount = CloudStorageAccount.Parse(StorageConnectionString);
การเรียกใช้งาน Table Services
// Create the table client.
CloudTableClient tableClient = storageAccount.CreateCloudTableClient();
หลังจากนั้นเราสามารถทำการสร้าง Table ตาม Code นี้
Code การสร้าง Table
    public partial class MainPage : PhoneApplicationPage
    {
        // Constructor
        public MainPage()
        {
            InitializeComponent();
            Loaded += MainPage_Loaded;
        }

        private async void MainPage_Loaded(object sender, System.Windows.RoutedEventArgs e)
        {
            // Create the connectionstring
            String StorageConnectionString = "DefaultEndpointsProtocol=https;AccountName=[yourAccount];AccountKey=[yourKey]";

            // Retrieve storage account from connection string.
            CloudStorageAccount storageAccount = CloudStorageAccount.Parse(StorageConnectionString);

            // Create the table client.
            CloudTableClient tableClient = storageAccount.CreateCloudTableClient();

            // Create the table if it doesn't exist.
            CloudTable table = tableClient.GetTableReference("customer");
            await table.CreateIfNotExistsAsync();

        }
    }
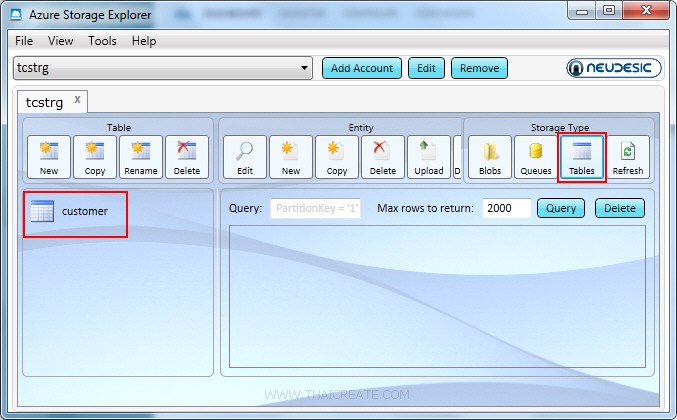
จาก Code จะได้ Table ชื่อว่า customer เมื่อใช้ Azure Storage Explorer เราจะพบกับตารางที่เราสร้างขึ้น
จากนั้นเราจะสร้าง Class ที่ทำหน้าที่เป็น Model Class เพื่อไว้ Mapping Column ข้อมูลที่อยู่ของ Table ที่อยู่บน Storage
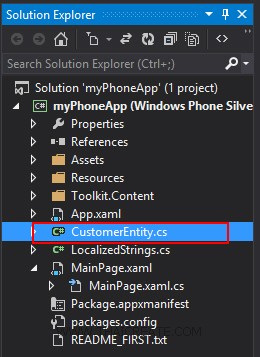
ให้สร้างชื่อว่า CustomerEntity.cs
using Microsoft.WindowsAzure;
using Microsoft.WindowsAzure.Storage.Table;

namespace myPhoneApp
{
    class CustomerEntity : TableEntity
    {

        public CustomerEntity(string pKey, string rKey)
        {
            this.PartitionKey = pKey;
            this.RowKey = rKey;
        }

        public string CustomerID { get; set; }

        public string Name { get; set; }

        public string Email { get; set; }

        public string CountryCode { get; set; }

        public string Budget { get; set; }

        public string Used { get; set; }

    }
}
สังเกตุว่าชื่อ Property ต่าง ๆ นั้นจะกลายเป็น Column อัตโนมัติ แต่เราจะเห็นว่าจะมีชื่อ PartitionKey และ RowKey ตัวนี้เปรียบเสมือน Key ของ Table
Example 1 การ Insert ข้อมูลลงบน Table
    public partial class MainPage : PhoneApplicationPage
    {
        // Constructor
        public MainPage()
        {
            InitializeComponent();
            Loaded += MainPage_Loaded;
        }

        private async void MainPage_Loaded(object sender, System.Windows.RoutedEventArgs e)
        {
            // Create the connectionstring
            String StorageConnectionString = "DefaultEndpointsProtocol=https;AccountName=[yourAccount];AccountKey=[yourKey]";

            // Retrieve storage account from connection string.
            CloudStorageAccount storageAccount = CloudStorageAccount.Parse(StorageConnectionString);

            // Create the table client.
            CloudTableClient tableClient = storageAccount.CreateCloudTableClient();

            // Create the CloudTable object that represents the "customer" table.
            CloudTable table = tableClient.GetTableReference("customer");

            // Create a new customer entity.
            CustomerEntity cus = new CustomerEntity("myCustomer", "C001");
            cus.CustomerID = "C001";
            cus.Name = "Win Weerachai";
            cus.Email = "[email protected]";
            cus.CountryCode = "TH";
            cus.Budget = "1000000.00";
            cus.Used = "600000.00";

            // Create the TableOperation that inserts the customer entity.
            TableOperation insertOperation = TableOperation.Insert(cus);

            // Execute the insert operation.
            await table.ExecuteAsync(insertOperation);

        }
    }
จาก Code จะเห็นว่ามีการส่งค่า PartitionKey และ RowKey ซึ่งตัวนี้เปรียบเหสมือน Key ของ Rows ควรเป็นค่าที่ไม่ซ้ำกัน ใช้ในการอ้างอิงถึง Key และ Index ทำให้สามารถอ่านข้อมูลได้อย่างรวดเร็ว
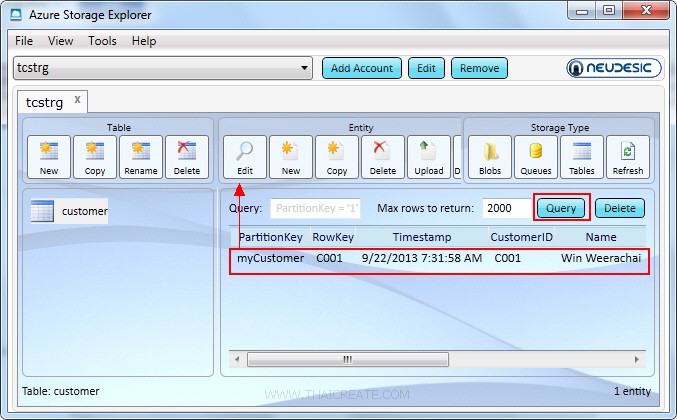
หลังจากที่ Insert เรียบร้อยแล้ว สามารถดูข้อมูลผ่าน Azure Storage Explorer ก็จะพบข้อมูลที่ Insert เข้าไป
ดูผ่านโปรแกรม Azure Storage Explorer เลือก Edit
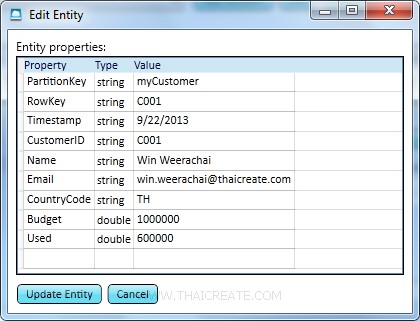
แสดงข้อมูลที่ถูก Insert ลงไปใน Table
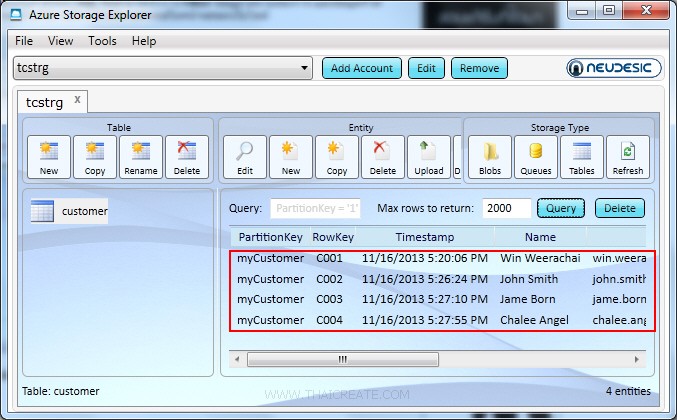
เมื่อทดสอบการเพิ่มข้อมูลอื่น ๆ เข้าไปหลาย ๆ รายการ ข้อมูลก็จะแบ่งออกเป็นหลาย ๆ Column / Rows ตามโครงสร้างที่ได้ออกแบบไว้
Example 2 การแสดง (List) รายการ Column / Rows ที่อยู่บน Table
    public partial class MainPage : PhoneApplicationPage
    {
        // Constructor
        public MainPage()
        {
            InitializeComponent();
            Loaded += MainPage_Loaded;
        }

        private async void MainPage_Loaded(object sender, System.Windows.RoutedEventArgs e)
        {
            // Create the connectionstring
            String StorageConnectionString = "DefaultEndpointsProtocol=https;AccountName=[yourAccount];AccountKey=[yourKey]";

            // Retrieve storage account from connection string.
            CloudStorageAccount storageAccount = CloudStorageAccount.Parse(StorageConnectionString);

            // Create the table client.
            CloudTableClient tableClient = storageAccount.CreateCloudTableClient();

            // Create the CloudTable object that represents the "customer" table.
            CloudTable table = tableClient.GetTableReference("customer");

            // Construct the query operation for all customer entities where PartitionKey="myCustomer".
            TableQuery<CustomerEntity> query = new TableQuery<CustomerEntity>().Where(TableQuery.GenerateFilterCondition("PartitionKey", QueryComparisons.Equal, "myCustomer"));

            // Create List Customer
            List<CustomerEntity> ls = new List<CustomerEntity>();

            // Print the fields for each customer.
            foreach (CustomerEntity entity in table.ExecuteAsync(query))
            {
                // Create a new customer entity.
                CustomerEntity cus = new CustomerEntity(entity.PartitionKey, entity.RowKey);
                cus.CustomerID = entity.CustomerID;
                cus.Name = entity.Name;
                cus.Email = entity.Email;
                cus.CountryCode = entity.CountryCode;
                cus.Budget = entity.Budget;
                cus.Used = entity.Used;
                ls.Add(cus);
            }

        }
    }
จาก Code นี้เราจะได้เป็น List รายการของ Table ทั้งหมด สามารถนำไป Bind แสดงผลบน ListBox , ListView หรือจะ Loop หรือนำไปใช้อย่างอื่นก็ได้เช่นเดียวกัน
Example 3 การแก้ไข (Update) รายการ Column / Rows ที่อยู่บน Table
    public partial class MainPage : PhoneApplicationPage
    {
        // Constructor
        public MainPage()
        {
            InitializeComponent();
            Loaded += MainPage_Loaded;
        }

        private async void MainPage_Loaded(object sender, System.Windows.RoutedEventArgs e)
        {
            // Create the connectionstring
            String StorageConnectionString = "DefaultEndpointsProtocol=https;AccountName=[yourAccount];AccountKey=[yourKey]";

            // Retrieve storage account from connection string.
            CloudStorageAccount storageAccount = CloudStorageAccount.Parse(StorageConnectionString);

            // Create the table client.
            CloudTableClient tableClient = storageAccount.CreateCloudTableClient();

            // Create the CloudTable object that represents the "customer" table.
            CloudTable table = tableClient.GetTableReference("customer");

            // Create a retrieve operation that takes a customer entity.
            TableOperation retrieveOperation = TableOperation.Retrieve<CustomerEntity>("myCustomer", "C001");

            // Execute the operation.
            TableResult retrievedResult = table.ExecuteBatchAsync(retrieveOperation);

            // Assign the result to a CustomerEntity object.
            CustomerEntity updateEntity = (CustomerEntity)retrievedResult.Result;

            if (updateEntity != null)
            {
                updateEntity.CustomerID = txtCustomerID.Text;
                updateEntity.Name = txtName.Text;
                updateEntity.Email = txtEmail.Text;
                updateEntity.CountryCode = txtCountryCode.Text;
                updateEntity.Budget = txtBudget.Text;
                updateEntity.Used = txtUsed.Text;

                // Create the InsertOrReplace TableOperation
                TableOperation insertOrReplaceOperation = TableOperation.InsertOrReplace(updateEntity);

                // Execute the operation.
                table.ExecuteBatchAsync(insertOrReplaceOperation);

            }

        }
    }
การ Update ข้อมูล ซึ่งในขั้นตอนแรกเราจะต้องทำการอ้างถึง Rows ที่ต้องการ Update ซะก่อนโดยใช้
TableOperation retrieveOperation = TableOperation.Retrieve<CustomerEntity>("myCustomer", "C001");
จากนั้นใช้การ Update ข้อมูลใหม่ด้วย
                updateEntity.CustomerID = txtCustomerID.Text;
                updateEntity.Name = txtName.Text;
                updateEntity.Email = txtEmail.Text;
                updateEntity.CountryCode = txtCountryCode.Text;
                updateEntity.Budget = txtBudget.Text;
                updateEntity.Used = txtUsed.Text;
Example 4 การลบ (Delete) รายการ Column/Rows ที่อยู่บน Table
    public partial class MainPage : PhoneApplicationPage
    {
        // Constructor
        public MainPage()
        {
            InitializeComponent();
            Loaded += MainPage_Loaded;
        }

        private async void MainPage_Loaded(object sender, System.Windows.RoutedEventArgs e)
        {
            // Create the connectionstring
            String StorageConnectionString = "DefaultEndpointsProtocol=https;AccountName=[yourAccount];AccountKey=[yourKey]";

            // Retrieve storage account from connection string.
            CloudStorageAccount storageAccount = CloudStorageAccount.Parse(StorageConnectionString);

            // Create the table client.
            CloudTableClient tableClient = storageAccount.CreateCloudTableClient();

            // Create the CloudTable object that represents the "customer" table.
            CloudTable table = tableClient.GetTableReference("customer");

            // Create a retrieve operation that expects a customer entity.
            TableOperation retrieveOperation = TableOperation.Retrieve<CustomerEntity>("myCustomer", "C001");

            // Execute the operation.
            TableResult retrievedResult = table.ExecuteBatchAsync(retrieveOperation);

            // Assign the result to a CustomerEntity.
            CustomerEntity deleteEntity = (CustomerEntity)retrievedResult.Result;

            // Create the Delete TableOperation.
            if (deleteEntity != null)
            {
                TableOperation deleteOperation = TableOperation.Delete(deleteEntity);

                // Execute the operation.
                table.ExecuteBatchAsync(deleteOperation);
            }

        }
    }
การลบข้อมูลจะเหมือนกับการ Update คือ จะต้องหา Rows ของข้อมูลด้วยคำสั่ง
TableOperation retrieveOperation = TableOperation.Retrieve<CustomerEntity>("myCustomer", "C001");
จากนั้นลบข้อมูลด้วยคำสั่ง
TableOperation deleteOperation = TableOperation.Delete(deleteEntity);
|
 ช่วยกันสนับสนุนรักษาเว็บไซต์ความรู้แห่งนี้ไว้ด้วยการสนับสนุน Source Code 2.0 ของทีมงานไทยครีเอท ช่วยกันสนับสนุนรักษาเว็บไซต์ความรู้แห่งนี้ไว้ด้วยการสนับสนุน Source Code 2.0 ของทีมงานไทยครีเอท
|
|
| |
By : |
ThaiCreate.Com Team (บทความเป็นลิขสิทธิ์ของเว็บไทยครีเอทห้ามนำเผยแพร่ ณ เว็บไซต์อื่น ๆ) |
| |
Score Rating : |
    |
|
| |
Create/Update Date : |
2014-07-27 19:06:41 /
2017-03-25 22:37:41 |
| |
Download : |
No files |
|
|
Sponsored Links / Related |
|
|
|
|
|
|

|