4.7. Getting Status Information
While you are working on your working copy you often need to know
which files you have changed/added/removed or renamed, or even which
files got changed and committed by others.
Now that you have checked out a working copy from a Subversion
repository you can see your files in the windows explorer with
changed icons. This is one of the reasons why TortoiseSVN is so
popular. TortoiseSVN adds a so called overlay icon to each
file icon which overlaps the original file icon. Depending on
the Subversion status of the file the overlay icon is different.
A fresh checked out working copy has a green checkmark as overlay.
That means the Subversion status is normal.
As soon as you start editing a file,
the status changes to modified
and the icon overlay then changes to a red exclamation
mark. That way you can easily see which files were changed
since you last updated your working copy and need to be committed.
If during an update a conflict occurs then
the icon changes to a yellow exclamation mark.
If you have set the svn:needs-lock property on a file,
Subversion makes that file read-only until you get a lock on that file.
Such files have this overlay to indicate that you have to get a lock
first before you can edit that file.
If you hold a lock on a file, and the Subversion status is
normal, this icon overlay reminds you that you
should release the lock if you are not using it to allow others to
commit their changes to the file.
This icon shows you that some files or folders inside the current folder
have been scheduled to be deleted from version control
or a file under version control is missing in a folder.
The plus sign tells you that a file or folder has been scheduled to be
added to version control.
The bar sign tells you that a file or folder is
ignored for version control purposes.
This overlay is optional.
This icon shows files and folders which are not under version control,
but have not been ignored.
This overlay is optional.
In fact, you may find that not all of these icons are used on your system.
This is because the number of overlays allowed by Windows is very limited
and if you are also using an old version of TortoiseCVS, then there are
not enough overlay slots available.
TortoiseSVN tries to be a “Good Citizen (TM)”
and limits its use of overlays to give other apps a chance too.
Now that there are more Tortoise clients around (TortoiseCVS, TortoiseHg, ...)
the icon limit becomes a real problem. To work around this, the TortoiseSVN
project introduced a common shared icon set, loaded as a DLL, which can be
used by all Tortoise clients. Check with your client provider to see if
this has been integrated yet :-)
For a description of how icon overlays correspond to Subversion
status and other technical details, read
Section F.1, “Icon Overlays”.
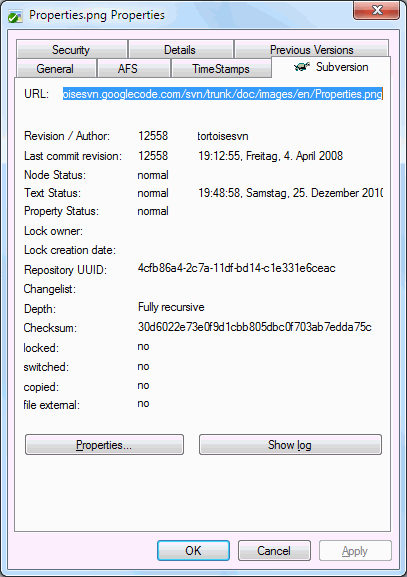
Sometimes you want to have more detailed information
about a file/directory than just the icon overlay.
You can get all the information Subversion provides in the
explorer properties dialog. Just select the file or
directory and select
→
in the context menu (note: this is the normal properties menu entry
the explorer provides, not the one in the TortoiseSVN submenu!).
In the properties dialog box TortoiseSVN has added a new
property page for files/folders under Subversion control,
where you can see all relevant information about the
selected file/directory.
4.7.3. TortoiseSVN Columns In Windows Explorer
The same information which is available from the icon overlays
(and much more) can be displayed as additional columns in
Windows Explorer's Details View.
Simply right click on one of the headings of a column, choose
from the context menu displayed. A
dialog will appear where you can specify the columns and their
order, which is displayed in the “Detailed View”. Scroll down
until the entries starting with SVN come into view. Check the
ones you would like to have displayed and close the dialog by
pressing OK. The columns will be appended
to the right of those currently displayed. You can reorder them by
drag and drop, or resize them, so that they fit your needs.
![[Important]](/images/svn/important.png) | Important |
|---|
The additional columns in the Windows Explorer are not
available on Vista, since Microsoft decided to not allow such
columns for all files anymore but only
for specific file types. |
![[Tip]](/images/svn/tip.png) | Tip |
|---|
If you want the current layout to be displayed in all your
working copies, you may want to make this the default view.
|
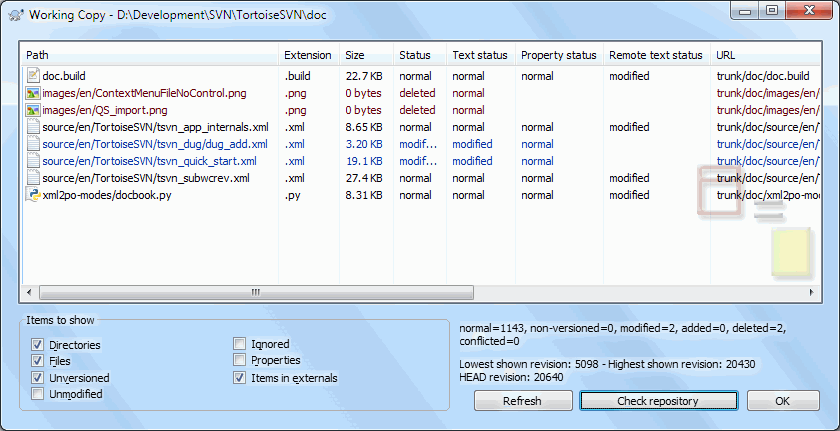
4.7.4. Local and Remote Status
It's often very useful to know which files you have
changed and also which files got changed and
committed by others. That's where the command
→
comes in handy.
This dialog will show you every file that has changed in any
way in your working copy, as well as any unversioned files
you may have.
If you click on the
Check Repository then you can also
look for changes in the repository. That way
you can check before an update if there's a possible conflict.
You can also update selected files from the repository without
updating the whole folder. By default, the Check Repository
button only fetches the remote status with the checkout depth
of the working copy. If you want to see all files and folders
in the repository, even those you have not checked out, then you
have to hold down the Shift key when you
click on the Check Repository button.
The dialog uses colour coding to highlight the status.
- Blue
Locally modified items.
- Purple
Added items.
Items which have been added with history have a
+ sign in the
Text status column,
and a tooltip shows where the item was copied from.
- Dark red
Deleted or missing items.
- Green
Items modified locally and in the repository.
The changes will be merged on update.
These may produce conflicts on update.
- Bright red
Items modified locally and deleted in repository,
or modified in repository and deleted locally.
These will produce conflicts on update.
- Black
Unchanged and unversioned items.
This is the default colour scheme, but you can customise those colours
using the settings dialog.
Read Section 4.30.1.4, “TortoiseSVN Colour Settings” for more information.
Items which have been switched to a different repository path are
also indicated using an (s) marker. You may have
switched something while working on a branch and forgotten to switch
back to trunk. This is your warning sign!
The context menu allows you to switch them back to the normal path again.
From the context menu of the dialog you can show a diff of the
changes. Check the local changes you made using
→ .
Check the changes in the repository made by others using
→ .
You can also revert changes in individual files. If you have deleted
a file accidentally, it will show up as Missing
and you can use Revert to recover it.
Unversioned and ignored files can be sent to the recycle bin from here using
→ .
If you want to delete files permanently (bypassing the recycle bin) hold
the Shift key while clicking on Delete.
If you want to examine a file in detail, you can drag it from here
into another application such as a text editor or IDE, or you can
save a copy simply by dragging it into a folder in explorer.
The columns are customizable. If you
right click on any column header you will see a
context menu allowing you to select which columns are displayed.
You can also change column width by using the drag handle which
appears when you move the mouse over a column boundary. These
customizations are preserved, so you will see the same headings
next time.
If you are working on several unrelated tasks at once, you can also
group files together into changelists.
Read Section 4.4.2, “Change Lists” for more information.
At the bottom of the dialog you can see a summary of the range of repository
revisions in use in your working copy. These are the commit
revisions, not the update revisions; they represent the
range of revisions where these files were last committed, not the revisions
to which they have been updated. Note that the revision range shown applies
only to the items displayed, not to the entire working copy. If you want to
see that information for the whole working copy you must check the
Show unmodified files checkbox.
| Tip |
|---|
If you want a flat view of your working copy, i.e. showing all files
and folders at every level of the folder hierarchy, then the
Check for Modifications dialog is the
easiest way to achieve that. Just check the
Show unmodified files checkbox to show
all files in your working copy.
|
| Repairing External Renames |
|---|
Sometimes files get renamed outside of Subversion, and they show up
in the file list as a missing file and an unversioned file. To avoid
losing the history you need to notify Subversion about the connection.
Simply select both the old name (missing) and the new name (unversioned)
and use
→
to pair the two files as a rename.
|
| Repairing External Copies |
|---|
If you made a copy of a file but forgot to use the Subversion command
to do so, you can repair that copy so the new file doesn't lose
its history.
Simply select both the old name (normal or modified) and the new name (unversioned)
and use
→
to pair the two files as a copy.
|
Often you want to look inside your files, to have a look at what
you've changed. You can accomplish this by selecting a file which
has changed, and selecting from
TortoiseSVN's context menu. This starts the external
diff-viewer, which will then compare the current file with the
pristine copy (BASE revision), which was stored
after the last checkout or update.
| Tip |
|---|
Even when not inside a working copy or when you have multiple
versions of the file lying around, you can still display diffs:
Select the two files you want to compare in explorer
(e.g. using Ctrl and the mouse) and
choose from TortoiseSVN's
context menu. The file clicked last (the one with the focus,
i.e. the dotted rectangle) will be regarded as the later
one.
|