|
| |
SignalR กับ Windows Form Application รับ-ส่ง ข้อมูลแบบ Real Time (VB.Net, C#) |
SignalR กับ Windows Form Application รับ-ส่ง ข้อมูลแบบ Real Time (VB.Net, C#) การเขียน Windows Form หรือ Desktop Application ให้รับส่งข้อมูลแบบ Real Time เป็นโจทย์ยากอีกอย่างหนึ่งของ Dev ในสายนี้ และเชื่อว่าหลายๆ คนจะมองไปถึงการออกแบบที่ง่าย ๆ เช่นออกไปในรูปแบบการใช้ Web API หรือพวก Web Services ที่ใช้ Timer เข้ามากำหนดเวลาให้ทำงานเป็น Loop ไว้สำหรับตรวจสอบข้อมูลใหม่ๆ จาก Web Server เช่น ให้ดึงข้อมูลทุก ๆ 3-5 วินาที เพราะวิธีนี้แอดมินก็เคยใช้มาก่อนเช่นเดียวกัน แต่ผลที่ได้คือโปรแกรมมี Performance ต่ำมาก ทำงานโดยไม่จำเป็น เพราะเมื่อมีการใช้งานหลาย ๆ เครื่อง จะมีเกิด Request ขึ้นมามากมาย ทั้งๆ ไม่มีข้อมูลใหม่ ทุก Client ก็จะทำการเชื่อมต่อทุกๆ เวลาที่ได้กำหนดขึ้น และผลที่ตามมาสุดท้ายคือ โปรแกรมค้าง รวมทั้ง Server ก็ค้างบ่อยเช่นเดียวกัน
และด้วยเหตุผลนี่เองเพื่อให้การใช้งานและพัฒนาโปรแกรมที่ใช้รับส่งข้อมูลแบบ Real Time ทาง Microsoft ได้ออก Library ที่ชื่อว่า SignalR เป็น Open Source ที่สามารถโหลดและใช้งานได้ฟรี สามารถดาวน์โหลดและ Install ผ่าน Nuget Package
 SignalR กับ Windows Form Application รับ-ส่ง ข้อมูลแบบ Real Time
SignalR ไม่ได้ออกแบบมาให้ทำงานเฉพาะบน ASP.Net เท่านั้น แต่มันยังสามารถทำงานร่วมกับ Windows Form Application , WPF และยังสามารถผสมผสาน การทำงานร่วมระหว่าง ASP.Net ที่ทำงานบน Web Browser กับ Windows Form เช่นส่งข้อความจาก Web ไปแสดงผลบน Windows Form หรือส่งจาก Windows Form ไปแสดงผลยังบน Web
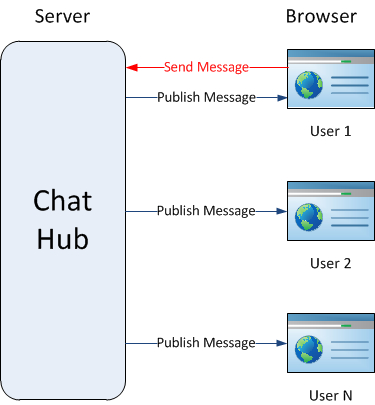
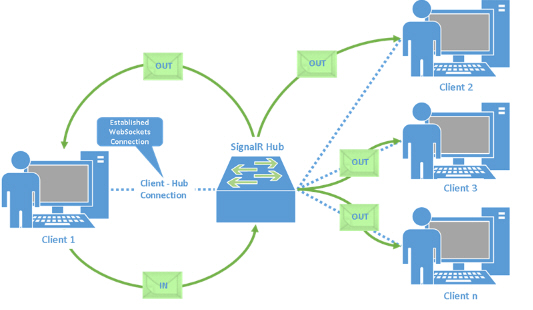
การทำงานของ SignalR บน Windows Form Application จะมีรูปแบบเหมือนกับ Web Application คือ จะต้องมีเครื่องใดเครื่องหนึ่งทำหน้าที่เป็น Server และ เครื่องที่ทำหน้าที่เป็น Server จะต้องเปิด Service ของ Hub อยู่ตลอดเวลา และ Client ต่างๆ จะเชื่อมต่อกับ Hub Server ผ่าน IP Address หรือ URL ซึ่งสามารถเชื่อมต่อได้ทั้งในรูปแบบ Local , Lan หรือ HTTP ที่เชื่อมกันผ่าน Web site
Step 1 : สร้าง SignalR Server เพื่อรัน Hub Server

เลือกสร้าง Windows Form Application ด้วย C# Project

ในที่นี้จะตั้งชื่อ Project ว่า SignalRServer

ให้เปลี่ยน Form1.cs ชื่อว่า StartServer.cs

จากนั้นเปิดไฟล์ Program.cs แล้วเพิ่มคำสั่งต่างๆ ดังรูป
Program.cs
using System;
using System.Collections.Generic;
using System.Linq;
using System.Threading.Tasks;
using System.Windows.Forms;

namespace SignalRServer
{
    static class Program
    {
        internal static StartServer MainForm { get; set; }
        /// <summary>
        /// The main entry point for the application.
        /// </summary>
        [STAThread]
        static void Main()
        {
            Application.EnableVisualStyles();
            Application.SetCompatibleTextRenderingDefault(false);
            MainForm = new StartServer();
            Application.Run(MainForm);
        }
    }
}
จากนั้นให้เปิด Package Manager Console

Tool -> Nuget Package Manager -> Package Manager Console
ให้ Install Package ต่างๆ ดังนี้

install-package Microsoft.AspNet.SignalR

กำลังติดตั้ง

Library ที่ได้

Install-Package Microsoft.Owin.Cors

Install-Package Microsoft.Owin.Hosting

Install-Package Microsoft.Owin.Host.HttpListener

Note! อย่าลืมว่าจะต้องติดตั้ง Library ให้ครบทุกวัน เพราะแอดมินเคยเจอว่าถ้า Library บางตัวหาย Service ของ Hub จะไม่ทำงาน

ให้เพิ่ม Class ใหม่และตั้งชื่อว่า MyHubChat.cs

ไฟล์ที่ได้
MyHubChat.cs
using Microsoft.AspNet.SignalR;
using Microsoft.Owin.Cors;
using Microsoft.Owin.Hosting;
using Owin;
using System;
using System.Reflection;
using System.Threading.Tasks;
using System.Windows.Forms;

namespace SignalRServer
{

    public class MyChatHub : Hub
    {
        public void Send(string name, string message)
        {
            Clients.All.addMessage(name, message);
        }
        public override Task OnConnected()
        {
            Program.MainForm.WriteToConsole("Client connected: " + Context.ConnectionId);
            return base.OnConnected();
        }
        public override Task OnDisconnected(bool stopCalled)
        {
            Program.MainForm.WriteToConsole("Client disconnected: " + Context.ConnectionId);
            return base.OnDisconnected(true);
        }
    }

}
ใช้ชื่อคลาสว่า MyChatHub ซึ่งตอนที่ Client เรียกใช้งานจะใช้คำว่า myChatHub

ให้เพิ่มคลาสใหม่ชื่อว่า OWIN Startup Class ชื่อว่า Startup.cs

ไฟล์ Startup.cs ที่ได้
Startup.cs
using System;
using System.Threading.Tasks;
using Microsoft.Owin.Cors;
using Microsoft.Owin.Hosting;
using Microsoft.Owin;
using Owin;

[assembly: OwinStartup(typeof(SignalRServer.Startup))]

namespace SignalRServer
{
    public class Startup
    {
        public void Configuration(IAppBuilder app)
        {
            app.UseCors(CorsOptions.AllowAll);
            app.MapSignalR();
        }
    }
}

กลับมาที่ฟอร์มของ StartServer.cs

ออกแบบ Form ดังรูป โดยใช้ Button และ RichTextBox จากนั้นสร้าง Method และ Event ต่างๆ ดังนี้
StartServer.cs
using Microsoft.AspNet.SignalR;
using Microsoft.Owin.Cors;
using Microsoft.Owin.Hosting;
using Owin;
using System;
using System.Reflection;
using System.Threading.Tasks;
using System.Windows.Forms;

namespace SignalRServer
{
    public partial class StartServer : Form
    {

        private IDisposable SignalR { get; set; }
        const string ServerURI = "http://localhost:8080"; // or IP Address

        public StartServer()
        {
            InitializeComponent();
        }

        private void ButtonStart_Click(object sender, EventArgs e)
        {
            WriteToConsole("Starting server...");
            ButtonStart.Enabled = false;
            Task.Run(() => GoStartServer());
        }

        private void ButtonStop_Click(object sender, EventArgs e)
        {
            Close();
        }

        private void GoStartServer()
        {
            try
            {
                SignalR = WebApp.Start(ServerURI);
            }
            catch (TargetInvocationException)
            {
                WriteToConsole("Server failed to start. A server is already running on " + ServerURI);
                //Re-enable button to let user try to start server again
                this.Invoke((Action)(() => ButtonStart.Enabled = true));
                return;
            }
            this.Invoke((Action)(() => ButtonStop.Enabled = true));
            WriteToConsole("Server started at " + ServerURI);
        }


        internal void WriteToConsole(String message)
        {
            if (RichTextBoxConsole.InvokeRequired)
            {
                this.Invoke((Action)(() =>
                    WriteToConsole(message)
                ));
                return;
            }
            RichTextBoxConsole.AppendText(message + Environment.NewLine);
        }

        private void StartServer_FormClosing(object sender, FormClosingEventArgs e)
        {
            if (SignalR != null)
            {
                SignalR.Dispose();
            }
        }

    }

}
Note! จากโค้สจะเห็น http://localhost:8080 ซึ่งเป็น IP Address และ Port ที่จะทำหน้าที่เป็น Hub Server
ทดสอบการทำงานของ Hub Server

กดปุ่ม Start

ถ้าขั้นดึงรูปแสดงว่าตอนที่ Hub Server ทำงานแล้วโดยผ่าน IP และ Port : http://localhost:8080
Note!: ในกรณีที่ Services ไม่ทำงานอาจจะต้องดูเรื่อง สิทธิ์ในการรันว่าเป็น Administrator หรือว่า Network ยอมใผ้ใช้ Port นั้นๆ ได้หรือไม่
Step 2 : สร้าง SignalR Client เพื่อทดสอบรับ-ส่งขอความระหว่าง Server กับ Client

สร้าง Windows Form Application ตั้งชื่อว่า SignalRClient

เปลี่ยน Form1.cs เป็นชื่อ StartClient.cs

จากนั้นติดตั้ง Library ของ SignalR
install-package Microsoft.AspNet.SignalR.Client

Library ที่ได้จากการติดตั้ง

กลับมาที่ฟอร์ม StartClient.cs ให้ออกแบบ Form ดังรูป ประกอบด้วย TextBox, Button และ RichTextBox
StartClient.cs
using Microsoft.AspNet.SignalR.Client;
using System;
using System.Net.Http;
using System.Windows.Forms;

namespace SignalRClient
{
    public partial class ClientStart : Form
    {

        private String UserName { get; set; }
        private IHubProxy HubProxy { get; set; }
        const string ServerURI = "http://localhost:8080/signalr";
        private HubConnection Connection { get; set; }

        public ClientStart()
        {
            InitializeComponent();
        }

        private void ButtonConnect_Click(object sender, EventArgs e)
        {
            UserName = TextBoxUsername.Text;
            if (!String.IsNullOrEmpty(UserName))
            {
                StatusText.Visible = true;
                StatusText.Text = "Connecting to server...";
                ConnectAsync();
            }
        }
        private void ButtonSend_Click(object sender, EventArgs e)
        {
            HubProxy.Invoke("Send", UserName, TextBoxMessage.Text);
            TextBoxMessage.Text = String.Empty;
            TextBoxMessage.Focus();
        }

        private async void ConnectAsync()
        {
            Connection = new HubConnection(ServerURI);
            Connection.Closed += Connection_Closed;
            HubProxy = Connection.CreateHubProxy("MyChatHub");
            //Handle incoming event from server: use Invoke to write to console from SignalR's thread
            HubProxy.On<string, string>("AddMessage", (name, message) =>
                this.Invoke((Action)(() =>
                    RichTextBoxConsole.AppendText(String.Format("{0}: {1}" + Environment.NewLine, name, message))
                ))
            );
            try
            {
                await Connection.Start();
            }
            catch (HttpRequestException)
            {
                StatusText.Text = "Unable to connect to server: Start server before connecting clients.";
                //No connection: Don't enable Send button or show chat UI
                return;
            }

            //Activate UI
            ButtonSend.Enabled = true;
            TextBoxMessage.Enabled = true;
            TextBoxMessage.Focus();
            TextBoxUsername.Enabled = false;
            ButtonConnect.Enabled = false;
            RichTextBoxConsole.AppendText("Connected to server at " + ServerURI + Environment.NewLine);
        }


        private void Connection_Closed()
        {
            //Deactivate chat UI; show login UI.
            this.Invoke((Action)(() => ButtonSend.Enabled = false));
            this.Invoke((Action)(() => StatusText.Text = "You have been disconnected."));
        }

    }
}
จากโค้ด http://localhost:8080/signalr เป็น URL หรือ IP ของ Hub Server
ทดสอบการทำงาน

ก่อนอื่นจะต้องรันตัว SignalRServer เพื่อเปิด Hub Services ให้ทำงานก่อน

จากนั้นก็รัน SignalRClient และทดสอบการเชื่อมต่อโดนคีย์ชื่อและคลิก Connect

ถ้าสามารถ Connect ได้ฝั่ง Client และ Server จะแสดง Message ว่ามีการเชื่อมต่อ

เพื่อให้สามารถรันได้หน้าจอให้เปิดโปรแกรมจากไฟล์ Debug โดยตรง

ในที่นี้จะเปิดขึ้นมาสามหน่าจอ โดยแต่ล่ะหน้าจอให้ User ที่แตกต่างกันไปเช่น max, win และ tookta และจากภาพจะเห็นว่าเมื่อ Client แต่ล่ะตัวทำการเชื่อมต่อ แจะแสดง Message ที่ Server ว่ามี Client ทำการ Connect เข้ามา

ทดสอบส่งข้อความจาก User ใด User หนึ่ง

จะเห็นว่าข้อความจะถูกส่งไปยังหน้าจอของทุกๆ User ที่ทำการเชื่อมต่อแบบทันทันที Real Time

ทดสอบการส่ง
Download Code ตัวอย่าง 1
ตัวอย่างที่ 2 การส่งข้อความแบบเจาะจงไปยัง Client
โดยการเพิ่มช่อง To ระบุว่าจะส่งไปถึงใคร

จากตัวอย่างแรกข้อความะถูกส่งไปยังทุก Client ที่ทำการเชื่อมต่อ แต่ในการทำงานจริงแล้ว เราอาจจะให้ข้อความส่งไปถึงแค่บาง Client เท่านั้น ซึ่งในการทำงานของ Hub จะมีการส่งข้อมูลไปทุก Client ตลอดเวลา แต่เราสามารถกรองที่ Client ว่าข้อความที่ส่งมาจะให้แสดงผลบนหน้าจอหรือไม่
สิ่งที่ปรับมีเพียงเล็กน้อยเท่านั้น
MyChatHub.cs
        public void Send(string name, string to, string message)
        {
            Clients.All.addMessage(name, to, message);
        }
ในฝั่ง Server เพิ่ม Parameters ที่จะเก็บ to
ClientStart.cs
            HubProxy.On<string, string, string>("AddMessage", (name, to, message) =>
                this.Invoke((Action)(() =>
                    SetText(name, to, message)
                ))
            );
ClientStart.cs
        public void SetText(string name, string to, string message) {
            if (to == UserName)
            {
                RichTextBoxConsole.AppendText(String.Format("{0}: {1}" + Environment.NewLine, name, message));
            }
        }
ClientStart.cs
HubProxy.Invoke("Send", UserName, TextBoxTo.Text, TextBoxMessage.Text);
ในส่วนของ Client ก็เพิ่ม to เข้าไปด้วยเช่นเดียวกัน โดนตอนที่รับข้อความจะมีการเช็ตว่า to นั้นตรงกับชื่อที่ Connect หรือไม่
ทดสอบการทำงาน

ให้เปิด Server และ Client ขึ้นมา 3 หน้าจอ ให้เชื่อมต่อโดยใช้ User ที่แตกต่างกันไปเช่น max, win และ tookta

ทดสอบข้อความจาก max ไปหา win ข้อความน้้นก็จะถูกส่งไปยังเฉพาะ win เท่านั้น หรือจะทดสอบด้วย User อื่นๆ ก็จะได้ผลเช่นเดียวกัน
และจากที่ได้เกริ้นไว้ก่อนหน้านี้ว่า SignalR สามารถทำงานร่วมกันจะหว่าง ASP.Net , Windows Form , WPF ฉะนั้นเมื่อ Hub Server ทำงาน เราก็สามารถที่จะใช้ Application ต่างๆ เชื่อมต่อเข้ามาได้
Default.html
<!DOCTYPE html>
<html>
<head>
<title>SignalR Simple Chat</title>
<style type="text/css">
.container {
background-color: #99CCFF;
border: thick solid #808080;
padding: 20px;
margin: 20px;
}
</style>
</head>
<body>
<p><strong>To connect the web client, reload this page after a server is started</strong></p>
<div class="container">
<div id="yourname"></div>
<input type="hidden" id="displayname" />
Send to <input type="text" id="to" size="5" /> Message <input type="text" id="message" />
<input type="button" id="sendmessage" value="Send" />
<ul id="discussion"></ul>
</div>
<!--Script references. -->
<!--Reference the jQuery library. -->
<script src="Scripts/jquery-1.10.2.min.js"></script>
<!--Reference the SignalR library. -->
<script src="Scripts/jquery.signalR-2.2.1.min.js"></script>
<!--Reference the autogenerated SignalR hub script. -->
<script src="http://localhost:8080/signalr/hubs"></script>
<!--Add script to update the page and send messages.-->
<script type="text/javascript">
$(function () {
//Set the hubs URL for the connection
$.connection.hub.url = "http://localhost:8080/signalr";
// Declare a proxy to reference the hub.
var chat = $.connection.myChatHub;
// Create a function that the hub can call to broadcast messages.
chat.client.addMessage = function (name, to, message) {
// Html encode display name and message.
if (to == $('#displayname').val()) {
var encodedName = $('<div />').text(name).html();
var encodedMsg = $('<div />').text(message).html();
// Add the message to the page.
$('#discussion').append('<li><strong>' + encodedName
+ '</strong>: ' + encodedMsg + '</li>');
}
};
// Get the user name and store it to prepend to messages.
$('#displayname').val(prompt('Enter your name:', ''));
$('#yourname').html('Your name = ' + $('#displayname').val());
// Set initial focus to message input box.
$('#message').focus();
// Start the connection.
$.connection.hub.start().done(function () {
$('#sendmessage').click(function () {
// Call the Send method on the hub.
chat.server.send($('#displayname').val(), $('#to').val(), $('#message').val());
// Clear text box and reset focus for next comment.
$('#message').val('').focus();
});
});
});
</script>
</body>
</html>
แค่เพียงอ้าง URL ให้ถูกต้อง http://localhost:8080/signalr ส่วนวิธีการสร้าง WebClient ให้อ่านจากบทความ ASP.Net SignalR

ทดสอบการทำงานบน Web ให้ Login ด้วย User : chat

ทดสอบส่งข้อความจาก Web ไปหา Windows Form

ทดสอบการส่งข้อความจาก Windows Form ไปหา Web
Download Code ตัวอย่าง 2
จากบทความนี้เชื่อว่าเป็นความรู้ใหม่สำหรับใครหลายๆ คน และเมื่อเราได้เรียนรู้กับประโยชน์และการทำงานของมันแล้ว จะเกิดไอเดียต่าง ๆ และมุมมองที่เปลี่ยนไปกับการพัฒนาโปรแกรมหลากหลายประเภท และมันจะเกิดประโยชน์มากมายถ้านำไปใช้ให้ถูกวิธีและวัตถุประสงค์ เพราะไม่ได้เจาะจงว่าจะเป็นในรูปแบบของ Chat เท่านั้น แต่ในหลายๆ Application ต้องการการทำงานที่รวดเร็วในทันที เช่น การทำระบบ Booking Online , การแสดงกราฟ การทำระบบ Notification ไปยัง Client และอื่นๆ
.
| |
|
|
|
|
 |
|
|
| |
By : |
TC Admin
|
| |
Article : |
บทความเป็นการเขียนโดยสมาชิก หากมีปัญหาเรื่องลิขสิทธิ์ กรุณาแจ้งให้ทาง webmaster ทราบด้วยครับ |
| |
Score Rating : |
 |
| |
Create Date : |
2017-01-13 |
| |
Download : |
No files |
|
|
|

|