ตอนที่ 5 : Show Case 1 : Register Form (iOS C# (Xamarin.iOS) and Mobile Services) |
ตอนที่ 5 : Show Case 1 : Register Form (iOS C# (Xamarin.iOS) and Mobile Services) บทความนี้จะเป็นการตัวอย่างการทำระบบ Member register รับข้อมูลจากเครื่อง iOS ด้วยภาษา C# (Xamarin.iOS) เช่น username , password , name , email และ tel โดยจะทำการส่งข้อมูลทั้งหมดเหล่านี้ไปจัดเก็บไว้ที่ตาราง Table ของ Mobile Service ที่อยู่บน Windows Azure ในรูปแบบของการ Register Form หรือ ลงทะเบียนสมาชิก
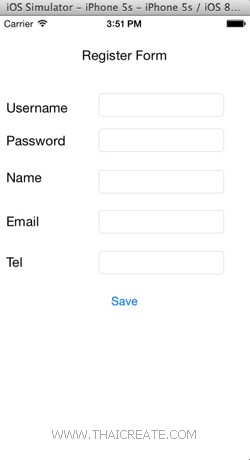 iOS C# (Xamarin.iOS) Mobile Services Register Form
บทความนี้ถือเป็นการทบทวนและประยุกต์ใช้จากการศึกษาในหัวข้อที่ผ่าน ๆ มา ซึ่งการทำนั้นก็ไม่ต่างอะไรกับการออกแบบ Form รับข้อมูลบน iOS ด้วย C# และ Insert ลงไปใน Table ของ Mobile Services
Syntax การ Register ข้อมูล
                client = new MobileServiceClient(ApplicationURL, ApplicationKey);

                memberTable = client.GetTable<MyMember>();

                var item = new MyMember
                {
                    Username = txtUsername.Text,
                    Password = txtPassword.Text,
                    Name = txtName.Text,
                    Email = txtEmail.Text,
                    Tel = txtTel.Text
                };
                memberTable.InsertAsync(item);
Example ตัวอย่างการทำระบบลงทะเบียน Member Register Form ด้วย iOS C# (Xamarin.iOS)

ตอนนี้เรามี Mobile Services อยู่ 1 รายการ

ชื่อตารางว่า MyMember

มีข้อมูลอยู่ 2 รายการ
กลับมายัง iOS C# Project บนโปรแกรม Visual Studio
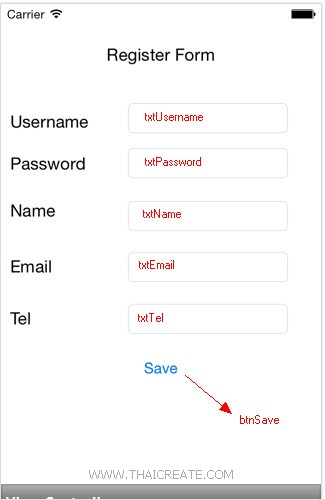
ออกแบบหน้าจอ View ประกอบด้วย Text Field และ Button พร้อมทั้งกำหนด ID/Name ดังรูป
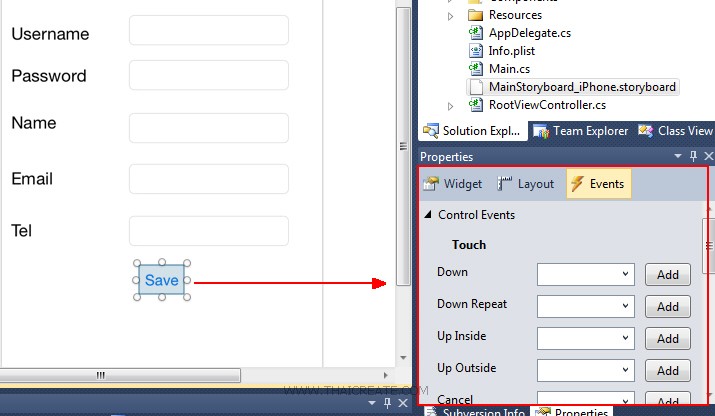
สร้าง Event ของการคลิกดังรูป

Event ทีได้ โดยเราจะเขียนคำสั่งสำหรับการ Save ข้อมูลลงใน Azure Mobile Services ที่ Method นี้
RootViewController.cs (Code ทั้งหมดของการสร้าง Register Form)
using System;
using System.Drawing;
using System.Collections.Generic;

using MonoTouch.Foundation;
using MonoTouch.UIKit;

using Microsoft.WindowsAzure.MobileServices;
using Newtonsoft.Json;

namespace iOSApp
{

    public class MyMember
    {
        public int Id { get; set; }

        [JsonProperty(PropertyName = "username")]
        public string Username { get; set; }

        [JsonProperty(PropertyName = "password")]
        public string Password { get; set; }

        [JsonProperty(PropertyName = "name")]
        public string Name { get; set; }

        [JsonProperty(PropertyName = "email")]
        public string Email { get; set; }

        [JsonProperty(PropertyName = "tel")]
        public string Tel { get; set; }
    }

    public partial class RootViewController : UIViewController
    {

        public const string ApplicationURL = @"https://thaicreate.azure-mobile.net/";
        public const string ApplicationKey = @"IqeWShAjBflTUrTaaGUNJRyZDpcyeh72";

        private MobileServiceClient client; // Mobile Service Client references
        private IMobileServiceTable<MyMember> memberTable; // Mobile Service Table used to access data

        public RootViewController(IntPtr handle)
            : base(handle)
        {
        }

        public override void ViewDidLoad()
        {
            base.ViewDidLoad();
        }

        public override void DidReceiveMemoryWarning()
        {
            // Releases the view if it doesn't have a superview.
            base.DidReceiveMemoryWarning();
        }


        partial void btnSave_TouchUpInside(UIButton sender)
        {
             try
            {
                client = new MobileServiceClient(ApplicationURL, ApplicationKey);

                memberTable = client.GetTable<MyMember>();

                var item = new MyMember
                {
                    Username = txtUsername.Text,
                    Password = txtPassword.Text,
                    Name = txtName.Text,
                    Email = txtEmail.Text,
                    Tel = txtTel.Text
                };
                memberTable.InsertAsync(item);

                new UIAlertView("Result", "Register Data Successfully.", null, "OK", null).Show();
            }
            catch (Exception ex)
            {
                new UIAlertView("Result", "Error : " + ex.Message, null, "OK", null).Show();
            }

        }

    }

}
ทดสอบการทำงาน

Register Form ทำการ Input ข้อมูล ผ่าน iOS Simulator
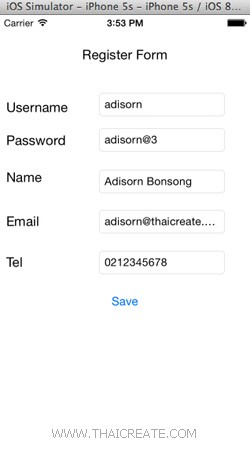
Register Form ทดสอบการ Input ข้อมูล
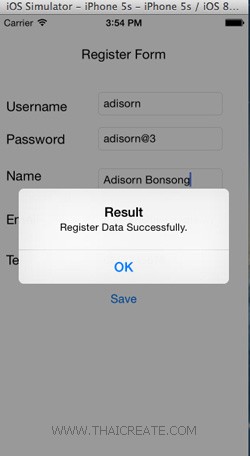
เมื่อ Input ข้อมูลเสร็จสิ้น

เมื่อกลับไปดูที่ Mobile Services บน Windows Azure ก็จะมีข้อมูลกรากฏขึ้นมา 1 รายการ
อ่านเพิ่มเติม
|