If you are importing into an existing repository which already
contains some projects, then the repository structure will already
have been decided.
If you are importing data into a new repository, then it is worth
taking the time to think about how it will be organised. Read
Section 3.1.5, “Repository Layout” for further advice.
This section describes the Subversion import command, which was designed
for importing a directory hierarchy into the repository in one shot.
Although it does the job, it has several shortcomings:
There is no way to select files and folders to include,
aside from using the global ignore settings.
The folder imported does not become a working copy. You have
to do a checkout to copy the files back from the server.
It is easy to import to the wrong folder level in the repository.
For these reasons we recommend that you do not use the import command
at all but rather follow the two-step method described in
Section 4.2.2, “Import in Place”, unless you are performing
the simple step of creating an initial
/trunk /tags /branches structure in your repository.
Since you are here, this is how the basic import works ...
Before you import your project into a repository you should:
Remove all files which are not needed to
build the project (temporary files, files which are
generated by a compiler e.g. *.obj, compiled
binaries, ...)
Organize the files in folders and
sub-folders. Although it is possible to rename/move
files later it is highly recommended to get your project's
structure straight before importing!
Now select the top-level folder of your project
directory structure in the windows explorer and
right click
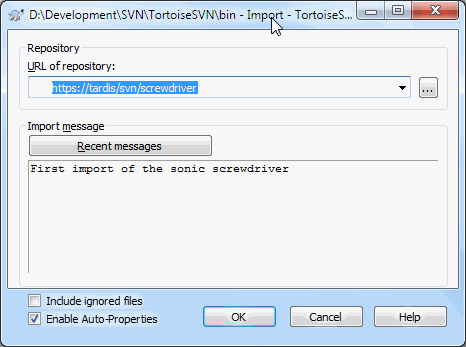
to open the context menu. Select the command
→
which brings up a dialog box:
In this dialog you have to enter the URL of the repository location
where you want to import your project.
It is very important to realise that the local folder you are
importing does not itself appear in the repository, only its content.
For example if you have a structure:
C:\Projects\Widget\source
C:\Projects\Widget\doc
C:\Projects\Widget\images
and you import C:\Projects\Widget into
http://mydomain.com/svn/trunk
then you may be surprised to find that your subdirectories go
straight into trunk rather than being in a
Widget subdirectory. You need to specify the
subdirectory as part of the URL,
http://mydomain.com/svn/trunk/Widget-X.
Note that the import command will automatically create subdirectories
within the repository if they do not exist.
The import message is used as a log message.
By default, files and folders which match the global-ignore patterns
are not imported. To override this behaviour you can
use the Include ignored files checkbox.
Refer to Section 4.30.1, “General Settings” for more information
on setting a global ignore pattern.
As soon as you press OK TortoiseSVN imports the
complete directory tree including all files into the repository.
The project is now stored in the repository under version control.
Please note that the folder you imported is NOT
under version control! To get a version-controlled
working copy
you need to do a Checkout of the version you just imported.
Or read on to find out how to import a folder in place.
Sometimes you need to have a file under version control which contains
user specific data. That means you have a file which every developer/user
needs to modify to suit his/her local setup. But versioning such a file
is difficult because every user would commit his/her changes every
time to the repository.
In such cases we suggest to use template files.
You create a file which contains all the data your developers
will need, add that file to version control and let the developers
check this file out. Then, each developer has to make a copy
of that file and rename that copy. After that, modifying the copy
is not a problem anymore.
As an example, you can have a look at TortoiseSVN's build script. It
calls a file named TortoiseVars.bat which
doesn't exist in the repository. Only the file
TortoiseVars.tmpl.
TortoiseVars.tmpl is the template file which
every developer has to create a copy from and rename that file
to TortoiseVars.bat. Inside that file, we added
comments so that the users will see which lines they have to edit
and change according to their local setup to get it working.
So as not to disturb the users, we also added the file
TortoiseVars.bat to the ignore list of its
parent folder, i.e. we've set the Subversion property
svn:ignore to include that filename.
That way it won't show up as unversioned on every commit.