|
| |
PHP Member Register and Email Activation ยืนยันการสมัครสมาชิกทางอีเมล์ |
PHP Member Register and Email Activation ตัวอย่าง Form Member Register สมัครสมาชิก และการส่ง Activation Code หรือยืนยันการสมาชิกทางอีเมล์ ด้วย PHP บนฐานข้อมูล MySQL
สำหรับตัวอย่างนี้เป็นตัวอย่างการออกแบบระบบสมาชิกที่แบ่งสมาชิกเป็น 2 ประเภท คือ Admin กับ User ซึ่งเป็นเพียงการยกตัวอย่างเท่านั้น แต่เมื่อมีการนำไปใช้งานจริง ๆ ในส่วนของ Admin หรือ User อาจจะกำหนดค่าเป็นอย่างอื่น
เริ่มต้นด้วยการสร้างตารางชื่อ member
CREATE TABLE `member` (
`UserID` int(3) NOT NULL auto_increment,
`Username` varchar(20) NOT NULL,
`Password` varchar(20) NOT NULL,
`Name` varchar(100) NOT NULL,
`Email` varchar(150) NOT NULL,
`Status` enum('ADMIN','USER') NOT NULL default 'USER',
`SID` varchar(32) NOT NULL,
`Active` enum('Yes','No') NOT NULL default 'No',
PRIMARY KEY (`UserID`),
UNIQUE KEY `Username` (`Username`)
) ENGINE=MyISAM DEFAULT CHARSET=utf8 AUTO_INCREMENT=2 ;

--
-- Dumping data for table `member`
--

INSERT INTO `member` VALUES (1, 'win', 'win123', 'Weerachai Nukitram', '[email protected]', 'USER', 'fb8d397fe980c10c84f0c77e1749c3f0', 'No');
คำอธิบายการทำงาน
จากบทความ
Go to : PHP MySQL กับ Login Form ทำระบบ User ล็อกอิน แบบง่าย ๆ ด้วย PHP และ MySQL โดยทำการตรวจสอบ Username และ Password
ในบทความก่อนหน้านี้จะเป็นการทำแบบ Form สำหรับสมัครสมาชิกโดยไม่มีการยืนยันหรือจรวจสอบว่า User นั้น ๆ หรือ Email นั้น ๆ ได้ถูกใช้งานจริงหรือไม่ ซึ่งในบทความนี้ได้มีการเพิ่มขั้นตอนการตรวจสอบข้อมูลของสมาชิก ที่ได้ทำการสมัครเข้ามานั้น ว่ามีข้อมูลอยู่จริง หรือ สามารถยืนยัน (Activate) ตัวตนที่แท้จริงของสมาชิก
กระบวนการตรวจสอบนั้นไม่ยากเลย โดยในขั้นตอนแรกการสมัครสมาชิก เราจะเก็บสถานะของสมาชิกว่ายังไม่ถูกเปิดใช้งาน โดยใช้ฟิวด์ชื่อ Active เก็บค่าเป็น Yes และ No ซึ่งเมื่อสมาชิกได้ทำการสมัครเข้ามาใหม่ก็จะได้ค่าเป็น No คือยังไม่ได้เปิดใช้งาน ส่วนฟิวด์ SID ใช้ในการตรวจสอบ Session ID ของ User นั้น ๆ ว่าตอนที่สมัครเข้ามานั้น Session ID เป็นอะไร (เป็นการเพิ่มเงื่อนไขในการตรวจสอบ เพราะค่า Session ID ของสมาชิกแต่ล่ะคนนั้นจะมีค่าไม่เหมือนกัน เป็นเหมือนรหัสในการยืนยัน)
โดยข้อมูลการ Activation จะถูกส่งไปทางอีเมล์ (Email) โดยการยืนยันจะส่งในรูปแบบของ URL เว็บไซต์ให้ User ทำการ Click หรือ นำ URL นั้นไปเปิดในเว็บไซต์ โดยทำการส่งค่า SessionID และ UserID ที่ได้จากขั้นตอนการสมัครเพื่อยืนยัน ตามตัวอย่าง
https://www.thaicreate.com/activate.php?sid=fb8d397fe980c10c84f0c77e1749c3f0&uid=1
จาก Link ที่ส่งไปนั้นเราจะต้องสร้างไฟล์ activate.php เพื่อรองรับการยืนยัน Account ขั้นตอนการยืนยันก็เพียงเลือก Record ของสมาชิกที่ได้ทำการสมัครตาม Session ID และ User ID และทำการ Update ฟิวด์ Active เป็น Yes
SELECT * FROM member WHERE SID = '".trim($_GET['sid'])."' AND UserID = '".trim($_GET['uid'])."'
หลังจากตรวจสอบถ้าข้อมูลถูกต้องก็ให้ทำการ Update ฟิวด์ Active เป็น Yes
UPDATE member SET Active = 'Yes' WHERE SID = '".trim($_GET['sid'])."' AND UserID = '".trim($_GET['uid'])."'
การตรวจสอบสมาชิกที่ผ่านการ Activation หรือไม่ ขั้นตอนนี้ในคำสั่ง SQL ที่ใช้ตรวจสอบการ Login ก็เพียงเพิ่มเงื่อนไข
Active = 'Yes'
Code ส่วนของตรวจสอบ User และ Password
SELECT * FROM member WHERE Username = '".trim($_POST['txtUsername'])."'
and Password = '".trim($_POST['txtPassword'])."'
and Active = 'Yes'
Code ทั้งหมด
- ขั้นตอนการสมัครสมาชิก
register.php
<html>
<head>
<title>ThaiCreate.Com Tutorials</title>
<meta http-equiv="Content-Type" content="text/html; charset=utf-8"></head>
<body>
<form name="form1" method="post" action="save_register.php">
Register Form <br>
<table width="400" border="1" style="width: 400px">
<tbody>
<tr>
<td width="125"> Username</td>
<td width="180">
<input name="txtUsername" type="text" id="txtUsername" size="20">
</td>
</tr>
<tr>
<td> Password</td>
<td><input name="txtPassword" type="password" id="txtPassword">
</td>
</tr>
<tr>
<td> Confirm Password</td>
<td><input name="txtConPassword" type="password" id="txtConPassword">
</td>
</tr>
<tr>
<td> Name</td>
<td><input name="txtName" type="text" id="txtName" size="35"></td>
</tr>
<tr>
</tr>
<tr>
<td> Email</td>
<td><input name="txtEmail" type="text" id="txtEmail" size="35"></td>
</tr>
<tr>
</tr>
</tbody>
</table>
<br>
<input type="submit" name="Submit" value="Save">
</form>
</body>
</html>

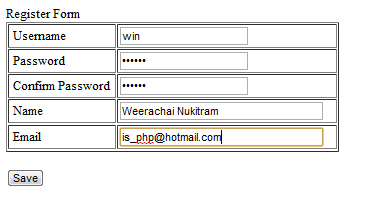
หน้าจอสำหรับการสมัครสมาชิก
save_register.php
<?php
	session_start();
	mysql_connect("localhost","root","root");
	mysql_select_db("mydatabase");

	if(trim($_POST["txtUsername"]) == "")
	{
		echo "Please input Username!";
		exit();
	}

	if(trim($_POST["txtPassword"]) == "")
	{
		echo "Please input Password!";
		exit();
	}

	if($_POST["txtPassword"] != $_POST["txtConPassword"])
	{
		echo "Password not Match!";
		exit();
	}

	if(trim($_POST["txtName"]) == "")
	{
		echo "Please input Name!";
		exit();
	}

	if(trim($_POST["txtEmail"]) == "")
	{
		echo "Please input Email!";
		exit();
	}

	$strSQL = "SELECT * FROM member WHERE Username = '".trim($_POST['txtUsername'])."' ";
	$objQuery = mysql_query($strSQL);
	$objResult = mysql_fetch_array($objQuery);
	if($objResult)
	{
			echo "Username already exists!";
	}
	else
	{

		$strSQL = "INSERT INTO member (Username,Password,Name,Email,Status,SID,Active) VALUES ('".$_POST["txtUsername"]."',
		'".$_POST["txtPassword"]."','".$_POST["txtName"]."' ,'".$_POST["txtEmail"]."','USER','".session_id()."','No')";
		$objQuery = mysql_query($strSQL);

		$Uid = mysql_insert_id();
		echo "Register Completed!<br>Please check your email to activate account";

		$strTo = $_POST["txtEmail"];
		$strSubject = "Activate Member Account";
		$strHeader = "Content-type: text/html; charset=windows-874\n"; // or UTF-8 //
		$strHeader .= "From: [email protected]\nReply-To: [email protected]";
		$strMessage = "";
		$strMessage .= "Welcome : ".$_POST["txtName"]."<br>";
		$strMessage .= "=================================<br>";
		$strMessage .= "Activate account click here.<br>";
		$strMessage .= "https://www.thaicreate.com/activate.php?sid=".session_id()."&uid=".$Uid."<br>";
		$strMessage .= "=================================<br>";
		$strMessage .= "ThaiCreate.Com<br>";

		$flgSend = mail($strTo,$strSubject,$strMessage,$strHeader);

	}

	mysql_close();
?>

สมัครสมาชิกเรียบร้อย

เมื่อเปิดดูข้อมูลในฐานข้อมูลผ่าน phpMyAdmin จะเห็นค่าฟิวด์ Active มีค่าเป็น No
การยืนยันทางอีเมล์

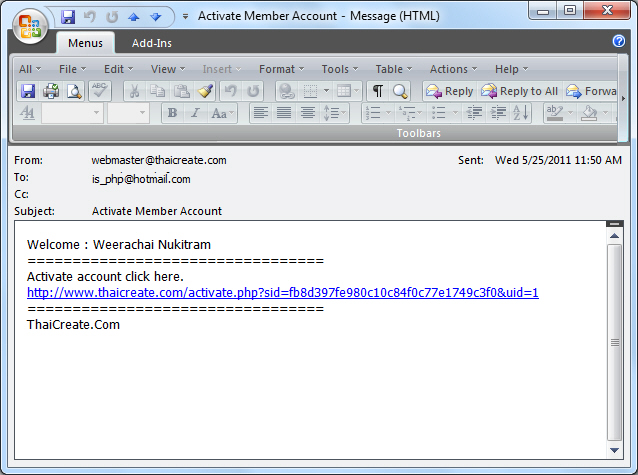
หลังจากสมัครสมาชิกเรียบร้อยแล้ว ก็จะได้รับอีเมล์เพื่อยืนยันการเปิดใช้งานสมาชิก จากรูปจะเห็นว่าจะเป็นการส่งลิงค์ให้คลิก หรือการ Copy URL ไปเปิดใน Web Browser
activate.php
<?php
	mysql_connect("localhost","root","root");
	mysql_select_db("mydatabase");

	$strSQL = "SELECT * FROM member WHERE SID = '".trim($_GET['sid'])."' AND UserID = '".trim($_GET['uid'])."' ";
	$objQuery = mysql_query($strSQL);
	$objResult = mysql_fetch_array($objQuery);
	if(!$objResult)
	{
			echo "Activate Invalid !";
	}
	else
	{
			$strSQL = "UPDATE member SET Active = 'Yes'  WHERE SID = '".trim($_GET['sid'])."' AND UserID = '".trim($_GET['uid'])."' ";
			$objQuery = mysql_query($strSQL);

		echo "Activate Successfully !";
	}

	mysql_close();
?>

กรณี Activate ไม่ถูกต้อง

กรณี Activate ข้อมูลถูกต้อง
เพิ่มเติม
https://www.thaicreate.com/activate.php?sid=fb8d397fe980c10c84f0c77e1749c3f0&uid=1
จากตัวอย่างจะเห็นว่าทำไมจะต้องใช้ Session ID มาเกี่ยวข้อง เพราะเป็นการเพิ่มเงื่อนไขเพื่อเข้ามาตรวจสอบด้วย เพราะไม่ฉะนั้น User แค่เปลี่ยนตรง URL uid=1 เป็น &uid=xxxxx ก็สามารถ Activate Account อื่น ๆ ได้แล้ว ซึ่งเมื่อเรานำ Session ID มาใช้ก็จะเป็นการยากแต่การคาดเดา Session ID หรือเป็นไปไม่ได้เลย

หลังจาก Activate ผ่านตรงฟิวด์ Active ก็ได้ถูก Update เป็น Yes เรียบร้อยแล้ว
- ขั้นตอนการ Login เข้าสู่ระบบ
login.php
<html>
<head>
<title>ThaiCreate.Com Tutorials</title>
</head>
<body>
<form name="form1" method="post" action="check_login.php">
Login<br>
<table border="1" style="width: 300px">
<tbody>
<tr>
<td> Username</td>
<td>
<input name="txtUsername" type="text" id="txtUsername">
</td>
</tr>
<tr>
<td> Password</td>
<td><input name="txtPassword" type="password" id="txtPassword">
</td>
</tr>
</tbody>
</table>
<br>
<input type="submit" name="Submit" value="Login">
</form>
</body>
</html>
check_login.php
<?php
	session_start();
	mysql_connect("localhost","root","root");
	mysql_select_db("mydatabase");
	$strSQL = "SELECT * FROM member WHERE Username = '".trim($_POST['txtUsername'])."'
	and Password = '".trim($_POST['txtPassword'])."'
	and Active = 'Yes' ";
	$objQuery = mysql_query($strSQL);
	$objResult = mysql_fetch_array($objQuery);
	if(!$objResult)
	{
			echo "Username and Password Incorrect!";
	}
	else
	{
			$_SESSION["UserID"] = $objResult["UserID"];
			$_SESSION["Status"] = $objResult["Status"];

			session_write_close();

			if($objResult["Status"] == "ADMIN")
			{
				echo "Welcome Admin";
				//header("location:admin_page.php");
			}
			else
			{
				echo "Welcome User";
				//header("location:user_page.php");
			}
	}
	mysql_close();
?>

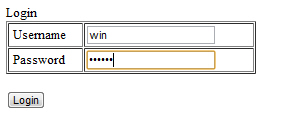
หน่าจอสำหรับ Login ซึ่งได้มีการตรวจสอบเงื่อนไข and Active = 'Yes' เพื่อตรวจสอบว่า User ได้ผ่านการ Activate มาหรือไม่

Login ผ่านแล้ว
สำหรับ ตัวอย่างการทำ Form Register และ Login สามารถอ่านเพิ่มเติมได้ที่
Go to : PHP MySQL กับ Login Form ทำระบบ User ล็อกอิน แบบง่าย ๆ ด้วย PHP และ MySQL โดยทำการตรวจสอบ Username และ Password
Go to : PHP Forgot Lost Password and Sending Password to Mail ทำ Form ลืมรหัสผ่าน ด้วย PHP กับ MySQL
บทความที่เกี่ยวข้อง
Go to : PHP Authentication : การใช้งาน Authentication ตรวจสอบสถานะการ Login
Go to : PHP Session ($_SESSION,$HTTP_SESSION_VARS)
Go to : PHP MySQL : Connect to MySQL Database ภาษา PHP กับฐานข้อมูล MySQL
.
| |
|
|
|
|
 |
|
|
| |
By : |
TC Admin
|
| |
Article : |
บทความเป็นการเขียนโดยสมาชิก หากมีปัญหาเรื่องลิขสิทธิ์ กรุณาแจ้งให้ทาง webmaster ทราบด้วยครับ |
| |
Score Rating : |
   |
| |
Create Date : |
2011-05-25 |
| |
Download : |
No files |
|
|
|

|