Android Taking Photo and Photo to Gallery |
Android Taking Photo and Photo to Gallery อีกความสามารถหนึ่งที่น่าสนใจในการเขียน Android ที่เกี่ยวข้องกับการถ่ายรูปด้วย Camera ก็คือ การใช้ Android เรียกกล้องถ่ายรูป และนำ Result รูปที่ได้จัดเก็บลงใน Storage (SD Card) และนำรุปภาพไปเพิ่มลงใน Gallery ของเครื่อง ซึ่งวิธีการนั้นสามารถทำได้ง่ายมากด้วยการ Intent ไปยัง Intent.ACTION_MEDIA_SCANNER_SCAN_FILE จากนั้นแปลงรุปภาพให้อยู่ในรูปแบบของ File Object และ sendBroadcast ไปยัง Gallery
 Android Taking Photo and Photo to Gallery
การเปิดกล้อง Camera ถ่ายรูปและ Capture รูปภาพ
        	    Intent takePictureIntent = new Intent(MediaStore.ACTION_IMAGE_CAPTURE);
        	    // Ensure that there's a camera activity to handle the intent
        	    if (takePictureIntent.resolveActivity(getPackageManager()) != null) {
        	        // Create the File where the photo should go
        	        File photoFile = null;
        	        try {
        	            photoFile = createImageFile();
        	        } catch (IOException ex) {}
        	        // Continue only if the File was successfully created
        	        if (photoFile != null) {
        	            takePictureIntent.putExtra(MediaStore.EXTRA_OUTPUT,
        	                    Uri.fromFile(photoFile));
        	            startActivityForResult(takePictureIntent, REQUEST_TAKE_PHOTO);
        	        }
        	    }
หลังจากถ่ายภาพเสร็จแล้วจะใช้การสร้างรูปภาพและจัดเก็บลงใน Storage SD Card
	private File createImageFile() throws IOException {
	    // Create an image file name
	    String timeStamp = new SimpleDateFormat("yyyyMMdd_HHmmss").format(new Date());
	    String imageFileName = "JPEG_" + timeStamp + "_";
	    File storageDir = new File(strSDCardPathName);
	    File image = File.createTempFile(
	        imageFileName,  /* prefix */
	        ".jpg",         /* suffix */
	        storageDir      /* directory */
	    );

	    // Save a file: path for use with ACTION_VIEW intents
	    mCurrentPhotoPath = image.getAbsolutePath();
	    return image;
	}
สามารถกำหนด Path ได้จาก Environment.getExternalStorageDirectory()
static String strSDCardPathName = Environment.getExternalStorageDirectory() + "/temp_picture" + "/";
การ Add รูปภาพลงใน Gallery
	private void GalleryAddPic() {
	    Intent mediaScanIntent = new Intent(Intent.ACTION_MEDIA_SCANNER_SCAN_FILE);
	    File f = new File(mCurrentPhotoPath);
	    Uri contentUri = Uri.fromFile(f);
	    mediaScanIntent.setData(contentUri);
	    this.sendBroadcast(mediaScanIntent);
	}
ในการเรียกใช้งาน Camera และ Save ลงใน Storage (SD Card) จะต้องกำหนด Permission และ Feature ดังนี้
AndroidManifest.xml
	<uses-permission android:name="android.permission.CAMERA" />
 	<uses-feature android:name="android.hardware.camera" android:required="true" />
    <uses-feature android:name="android.hardware.camera.autofocus" />

    <uses-permission android:name="android.permission.WRITE_EXTERNAL_STORAGE" />
Example ตัวอย่างการเขียน Android เพื่อเปิดกล้องถ่ายรูปและ Capture รูปภาพ และ การ Add รูปภาพลงใน Gallery

โครงสร้างของไฟล์ในโปรเจคสามารถใช้ได้ทั้งบน Eclipse และ Android Studio

activity_main.xml
<TableLayout xmlns:android="http://schemas.android.com/apk/res/android"
    android:id="@+id/tableLayout1"
    android:layout_width="fill_parent"
    android:layout_height="fill_parent">

   	<TableRow
      android:id="@+id/tableRow1"
      android:layout_width="wrap_content"
      android:layout_height="wrap_content" >

     <TextView
        android:id="@+id/textView1"
        android:layout_width="wrap_content"
        android:layout_height="wrap_content"
        android:gravity="center"
        android:text="Camera Take Photo "
        android:layout_span="1"
        android:textAppearance="?android:attr/textAppearanceLarge" />

 	</TableRow>

	<View
		android:layout_height="1dip"
		android:background="#CCCCCC" />

  <TableLayout
      android:layout_width="fill_parent"
      android:layout_height="wrap_content"
      android:layout_weight="0.1"
      android:orientation="horizontal" >


      <ImageView
          android:id="@+id/imgView"
          android:layout_width="wrap_content"
          android:layout_height="wrap_content"
          android:layout_weight="0.75"
          android:src="@drawable/ic_launcher" />

      <Button
          android:id="@+id/btnTakePhoto"
          android:layout_width="wrap_content"
          android:layout_height="wrap_content"
          android:text="Take Photo" />
  </TableLayout>

	<View
		android:layout_height="1dip"
		android:background="#CCCCCC" />

   	<LinearLayout
      android:id="@+id/LinearLayout1"
      android:layout_width="wrap_content"
      android:layout_height="wrap_content"
      android:padding="5dip" >

   		<TextView
   		    android:id="@+id/textView2"
   		    android:layout_width="wrap_content"
   		    android:layout_height="wrap_content"
   		    android:text="By.. ThaiCreate.Com" />

	</LinearLayout>

</TableLayout>
ไฟล์ Java
MainActivity.java
package com.myapp;

import android.os.Bundle;
import android.os.Environment;
import android.provider.MediaStore;

import java.io.File;
import java.io.IOException;
import java.text.SimpleDateFormat;
import java.util.Date;

import android.app.Activity;
import android.content.Intent;
import android.graphics.Bitmap;
import android.graphics.BitmapFactory;
import android.net.Uri;
import android.view.View;
import android.view.Menu;
import android.widget.Button;
import android.widget.ImageView;

public class MainActivity extends Activity {

	ImageView imgView;
	static final int REQUEST_TAKE_PHOTO = 1;
	String mCurrentPhotoPath;

	static String strSDCardPathName = Environment.getExternalStorageDirectory() + "/temp_picture" + "/";

	@Override
    public void onCreate(Bundle savedInstanceState) {
        super.onCreate(savedInstanceState);
        setContentView(R.layout.activity_main);

        //*** Create Folder
        createFolder();

        //*** ImageView
        imgView = (ImageView) findViewById(R.id.imgView);

        //*** Take Photo
        final Button btnTakePhoto = (Button) findViewById(R.id.btnTakePhoto);
        // Perform action on click
        btnTakePhoto.setOnClickListener(new View.OnClickListener() {
            public void onClick(View v) {

        	    Intent takePictureIntent = new Intent(MediaStore.ACTION_IMAGE_CAPTURE);
        	    // Ensure that there's a camera activity to handle the intent
        	    if (takePictureIntent.resolveActivity(getPackageManager()) != null) {
        	        // Create the File where the photo should go
        	        File photoFile = null;
        	        try {
        	            photoFile = createImageFile();
        	        } catch (IOException ex) {}
        	        // Continue only if the File was successfully created
        	        if (photoFile != null) {
        	            takePictureIntent.putExtra(MediaStore.EXTRA_OUTPUT,
        	                    Uri.fromFile(photoFile));
        	            startActivityForResult(takePictureIntent, REQUEST_TAKE_PHOTO);
        	        }
        	    }

            }
        });

    }


	private File createImageFile() throws IOException {
	    // Create an image file name
	    String timeStamp = new SimpleDateFormat("yyyyMMdd_HHmmss").format(new Date());
	    String imageFileName = "JPEG_" + timeStamp + "_";
	    File storageDir = new File(strSDCardPathName);
	    File image = File.createTempFile(
	        imageFileName,  /* prefix */
	        ".jpg",         /* suffix */
	        storageDir      /* directory */
	    );

	    // Save a file: path for use with ACTION_VIEW intents
	    mCurrentPhotoPath = image.getAbsolutePath();
	    return image;
	}


	@Override
	protected void onActivityResult(int requestCode, int resultCode, Intent data) {
	    if (resultCode == RESULT_OK) {
			Bitmap bitmap = BitmapFactory.decodeFile(mCurrentPhotoPath);
			imgView.setImageBitmap(bitmap);

			//*** Add to Gallery
			GalleryAddPic();
	    }
	}

	private void GalleryAddPic() {
	    Intent mediaScanIntent = new Intent(Intent.ACTION_MEDIA_SCANNER_SCAN_FILE);
	    File f = new File(mCurrentPhotoPath);
	    Uri contentUri = Uri.fromFile(f);
	    mediaScanIntent.setData(contentUri);
	    this.sendBroadcast(mediaScanIntent);
	}

	 public static void createFolder()
     {
		File folder = new File(strSDCardPathName);
		try
		{
			// Create folder
			if (!folder.exists()) {
			    folder.mkdir();
			}
		}catch(Exception ex){}

     }

    @Override
    public boolean onCreateOptionsMenu(Menu menu) {
        getMenuInflater().inflate(R.menu.main, menu);
        return true;
    }

}
Screenshot

หน้าแรกของ App ให้คลิกที่ Take Photo

โปรแกรมจะ Intent ไปยัง App ที่ทำหน้าที่ถ่ายรูป และเปิด Camera

หลังจากที่ถ่ายรูปเสร็จแล้วโปรแกรมจะถามว่าต้องการ Save รูปนี้หรือไม่

เมื่อกด Save ภาพถ่ายจะถูกจัดเก็บลงใน Storage ตามโฟเดอร์ที่กำหนด และแสดงผลบน ImageView

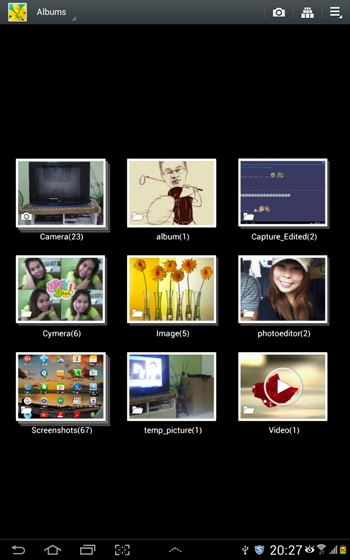
เปิด Gallery บน Android
รุปที่ถูกถ่ายจะถูกเพิ่มลงใน Gallery
.
|
 ช่วยกันสนับสนุนรักษาเว็บไซต์ความรู้แห่งนี้ไว้ด้วยการสนับสนุน Source Code 2.0 ของทีมงานไทยครีเอท ช่วยกันสนับสนุนรักษาเว็บไซต์ความรู้แห่งนี้ไว้ด้วยการสนับสนุน Source Code 2.0 ของทีมงานไทยครีเอท
|
|
| |
By : |
ThaiCreate.Com Team (บทความเป็นลิขสิทธิ์ของเว็บไทยครีเอทห้ามนำเผยแพร่ ณ เว็บไซต์อื่น ๆ) |
| |
Score Rating : |
 |
|
| |
Create/Update Date : |
2015-11-16 15:56:02 /
2017-03-26 21:08:57 |
| |
Download : |
No files |
|
|
Sponsored Links / Related |
|
|
|
|
|
|

|


