Android Taking Photo and Resize Images (Quality, Size, Width, Height) |
Android Taking Photo and Resize Images (Quality, Size, Width, Height) ในการใช้งานรูปภาพบน Android App ปัญหาที่พบได้เจอบ่อย ๆ คือ OutOfMemoryError สาเหตุของมันเกิดจากมีการโหลดรูปภาพที่มีขนาดใหญ่ใหญ่เกินมาใช้งานใน App วิธีการแก้ไขปัญหาคือ ลดขนาดหรือ Resize ของรูปภาพให้มีขนาดเล็กลง และกระบวนการ Resize รูปนั้นสามารถทำได้ 2 วิธี Resize ภาพต้นฉบับที่ได้จากการถ่ายรูป ให้มีขนาดและ Size ความสูง (Height) ความกว้าง (Width) ตามที่ต้องการ หรืออีกวิธีคือ เก็บตามต้นฉบับที่ได้จากการถ่ายรุปจริง และ ค่อย Resize ตอนที่แสดงผล ซึ่งในบทความนี้มีทั้ง 2 วิธี
 Android Taking Photo and Resize Images (Quality, Size, Width, Height)
การเปิดกล้อง Camera ถ่ายรูปและ Capture รูปภาพ
        	    Intent takePictureIntent = new Intent(MediaStore.ACTION_IMAGE_CAPTURE);
        	    // Ensure that there's a camera activity to handle the intent
        	    if (takePictureIntent.resolveActivity(getPackageManager()) != null) {
        	        // Create the File where the photo should go
        	        File photoFile = null;
        	        try {
        	            photoFile = createImageFile();
        	        } catch (IOException ex) {}
        	        // Continue only if the File was successfully created
        	        if (photoFile != null) {
        	            takePictureIntent.putExtra(MediaStore.EXTRA_OUTPUT,
        	                    Uri.fromFile(photoFile));
        	            startActivityForResult(takePictureIntent, REQUEST_TAKE_PHOTO);
        	        }
        	    }
หลังจากถ่ายภาพเสร็จแล้วจะใช้การสร้างรูปภาพและจัดเก็บลงใน Storage SD Card
	private File createImageFile() throws IOException {
	    // Create an image file name
	    String timeStamp = new SimpleDateFormat("yyyyMMdd_HHmmss").format(new Date());
	    String imageFileName = "JPEG_" + timeStamp + "_";
	    File storageDir = new File(strSDCardPathName);
	    File image = File.createTempFile(
	        imageFileName,  /* prefix */
	        ".jpg",         /* suffix */
	        storageDir      /* directory */
	    );

	    // Save a file: path for use with ACTION_VIEW intents
	    mCurrentPhotoPath = image.getAbsolutePath();
	    return image;
	}
สามารถกำหนด Path ได้จาก Environment.getExternalStorageDirectory()
static String strSDCardPathName = Environment.getExternalStorageDirectory() + "/temp_picture" + "/";
การ Resize เพื่อลดขนาดของรุปภาพ สามารถกำหนดขนาด Size และคุณภาพ Quality
	public static void ResizeImages(String sPath,String sTo) throws IOException {

        Bitmap photo = BitmapFactory.decodeFile(sPath);
        photo = Bitmap.createScaledBitmap(photo, 300, 300, false);
        ByteArrayOutputStream bytes = new ByteArrayOutputStream();
        photo.compress(Bitmap.CompressFormat.JPEG, 100, bytes);

        File f = new File(sTo);
        f.createNewFile();
        FileOutputStream fo = new FileOutputStream(f);
        fo.write(bytes.toByteArray());
        fo.close();

        File file =  new File(sPath);
        file.delete();

	}
ในการเรียกใช้งาน Camera และ Save ลงใน Storage (SD Card) จะต้องกำหนด Permission และ Feature ดังนี้
AndroidManifest.xml
	<uses-permission android:name="android.permission.CAMERA" />
 	<uses-feature android:name="android.hardware.camera" android:required="true" />
    <uses-feature android:name="android.hardware.camera.autofocus" />

    <uses-permission android:name="android.permission.WRITE_EXTERNAL_STORAGE" />
Example ตัวอย่างการเขียน Android เพื่อเปิดกล้องถ่ายรูปและ Capture รูปภาพ และ Resize เพื่อลดขนาดของรูปภาพ
")
โครงสร้างของไฟล์ในโปรเจคสามารถใช้ได้ทั้งบน Eclipse และ Android Studio
")
activity_main.xml
<TableLayout xmlns:android="http://schemas.android.com/apk/res/android"
    android:id="@+id/tableLayout1"
    android:layout_width="fill_parent"
    android:layout_height="fill_parent">

   	<TableRow
      android:id="@+id/tableRow1"
      android:layout_width="wrap_content"
      android:layout_height="wrap_content" >

     <TextView
        android:id="@+id/textView1"
        android:layout_width="wrap_content"
        android:layout_height="wrap_content"
        android:gravity="center"
        android:text="Camera Take Photo "
        android:layout_span="1"
        android:textAppearance="?android:attr/textAppearanceLarge" />

 	</TableRow>

	<View
		android:layout_height="1dip"
		android:background="#CCCCCC" />

  <TableLayout
      android:layout_width="fill_parent"
      android:layout_height="wrap_content"
      android:layout_weight="0.1"
      android:orientation="horizontal" >


      <ImageView
          android:id="@+id/imgView"
          android:layout_width="wrap_content"
          android:layout_height="wrap_content"
          android:layout_weight="0.75"
          android:src="@drawable/ic_launcher" />

      <Button
          android:id="@+id/btnTakePhoto"
          android:layout_width="wrap_content"
          android:layout_height="wrap_content"
          android:text="Take Photo" />
  </TableLayout>

	<View
		android:layout_height="1dip"
		android:background="#CCCCCC" />

   	<LinearLayout
      android:id="@+id/LinearLayout1"
      android:layout_width="wrap_content"
      android:layout_height="wrap_content"
      android:padding="5dip" >

   		<TextView
   		    android:id="@+id/textView2"
   		    android:layout_width="wrap_content"
   		    android:layout_height="wrap_content"
   		    android:text="By.. ThaiCreate.Com" />

	</LinearLayout>

</TableLayout>
ไฟล์ Java
MainActivity.java
package com.myapp;

import android.os.Bundle;
import android.os.Environment;
import android.provider.MediaStore;

import java.io.ByteArrayOutputStream;
import java.io.File;
import java.io.FileOutputStream;
import java.io.IOException;
import java.text.SimpleDateFormat;
import java.util.Date;

import android.app.Activity;
import android.content.Intent;
import android.graphics.Bitmap;
import android.graphics.BitmapFactory;
import android.net.Uri;
import android.view.View;
import android.view.Menu;
import android.widget.Button;
import android.widget.ImageView;

public class MainActivity extends Activity {

	ImageView imgView;
	static final int REQUEST_TAKE_PHOTO = 1;
	String mCurrentPhotoPath;

	static String strSDCardPathName = Environment.getExternalStorageDirectory() + "/temp_picture" + "/";

	@Override
    public void onCreate(Bundle savedInstanceState) {
        super.onCreate(savedInstanceState);
        setContentView(R.layout.activity_main);

        //*** Create Folder
        createFolder();

        //*** ImageView
        imgView = (ImageView) findViewById(R.id.imgView);

        //*** Take Photo
        final Button btnTakePhoto = (Button) findViewById(R.id.btnTakePhoto);
        // Perform action on click
        btnTakePhoto.setOnClickListener(new View.OnClickListener() {
            public void onClick(View v) {

        	    Intent takePictureIntent = new Intent(MediaStore.ACTION_IMAGE_CAPTURE);
        	    // Ensure that there's a camera activity to handle the intent
        	    if (takePictureIntent.resolveActivity(getPackageManager()) != null) {
        	        // Create the File where the photo should go
        	        File photoFile = null;
        	        try {
        	            photoFile = createImageFile();
        	        } catch (IOException ex) {}
        	        // Continue only if the File was successfully created
        	        if (photoFile != null) {
        	            takePictureIntent.putExtra(MediaStore.EXTRA_OUTPUT,
        	                    Uri.fromFile(photoFile));
        	            startActivityForResult(takePictureIntent, REQUEST_TAKE_PHOTO);
        	        }
        	    }

            }
        });

    }


	private File createImageFile() throws IOException {
	    // Create an image file name
	    String timeStamp = new SimpleDateFormat("yyyyMMdd_HHmmss").format(new Date());
	    String imageFileName = "JPEG_" + timeStamp + "_";
	    File storageDir = new File(strSDCardPathName);
	    File image = File.createTempFile(
	        imageFileName,  /* prefix */
	        ".jpg",         /* suffix */
	        storageDir      /* directory */
	    );

	    // Save a file: path for use with ACTION_VIEW intents
	    mCurrentPhotoPath = image.getAbsolutePath();
	    return image;
	}


	@Override
	protected void onActivityResult(int requestCode, int resultCode, Intent data) {
	    if (resultCode == RESULT_OK) {

	    	//*** Rename File
	    	String strNewName = "MyPicture.jpg";
	    	String NewPath = strSDCardPathName + strNewName;

	    	//*** Resize Images
	    	try {
				ResizeImages(mCurrentPhotoPath,NewPath);
			} catch (IOException e) {
				// TODO Auto-generated catch block
				e.printStackTrace();
			}

			Bitmap bitmap = BitmapFactory.decodeFile(NewPath);
			imgView.setImageBitmap(bitmap);
	    }
	}

	public static void ResizeImages(String sPath,String sTo) throws IOException {

        Bitmap photo = BitmapFactory.decodeFile(sPath);
        photo = Bitmap.createScaledBitmap(photo, 300, 300, false);
        ByteArrayOutputStream bytes = new ByteArrayOutputStream();
        photo.compress(Bitmap.CompressFormat.JPEG, 100, bytes);

        File f = new File(sTo);
        f.createNewFile();
        FileOutputStream fo = new FileOutputStream(f);
        fo.write(bytes.toByteArray());
        fo.close();

        File file =  new File(sPath);
        file.delete();

	}

	 public static void createFolder()
     {
		File folder = new File(strSDCardPathName);
		try
		{
			// Create folder
			if (!folder.exists()) {
			    folder.mkdir();
			}
		}catch(Exception ex){}

     }

    @Override
    public boolean onCreateOptionsMenu(Menu menu) {
        getMenuInflater().inflate(R.menu.main, menu);
        return true;
    }

}
Screenshot
")
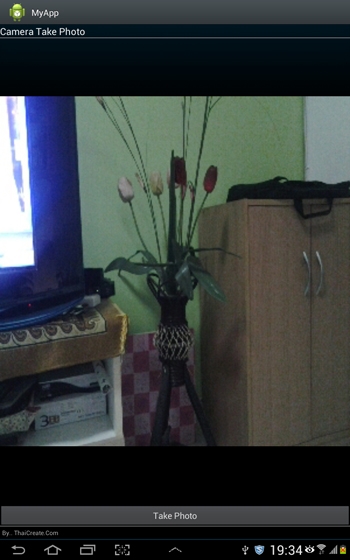
หน้าแรกของ App ให้คลิกที่ Take Photo
")
โปรแกรมจะ Intent ไปยัง App ที่ทำหน้าที่ถ่ายรูป และเปิด Camera
")
หลังจากที่ถ่ายรูปเสร็จแล้วโปรแกรมจะถามว่าต้องการ Save รูปนี้หรือไม่
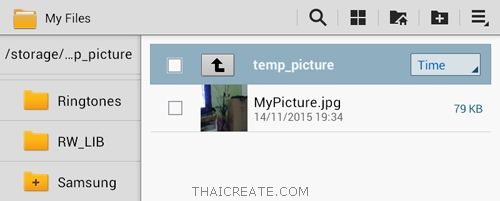
เมื่อกด Save ภาพถ่ายจะถูกจัดเก็บลงใน Storage ตามโฟเดอร์ที่กำหนด
ภาพถ่ายจัดเก็บอยู่ใน Storage (SD Card) จะเห็นว่าขนาดของไฟล์จะถูกย่อให้เล็กลงตาม Size ที่กำหนดในฟังก์ชั่นของ ResizeImages
ในกรณีที่ไม่ต้องการ Resize ไฟล์ต้นฉบับแต่จะ Resize เฉพาะตอนที่แสดงผลให้เอาคำสั่ง ResizeImages ออกและกำหนดเงื่อนไขก่อนที่จะแสดงผล
	 public static Bitmap decodeFile(File file, int iWidth, int iHeight){
		 try {
		     //Decode image size
		     BitmapFactory.Options o = new BitmapFactory.Options();
		     o.inJustDecodeBounds = true;
		     BitmapFactory.decodeStream(new FileInputStream(file),null,o);

		     //The new size we want to scale to
		     final int REQUIRED_WIDTH = iWidth;
		     final int REQUIRED_HIGHT = iHeight;
		     //Find the correct scale value. It should be the power of 2.
		     int scale=1;
		     while(o.outWidth/scale/2>=REQUIRED_WIDTH && o.outHeight/scale/2>=REQUIRED_HIGHT)
		         scale*=2;

		     //Decode with inSampleSize
		     BitmapFactory.Options o2 = new BitmapFactory.Options();
		     o2.inSampleSize=scale;
		     return BitmapFactory.decodeStream(new FileInputStream(file), null, o2);
		 } catch (FileNotFoundException e) {}
		 return null;
	}
        Bitmap bm = decodeFile(new File("/sdcard/image.jpg"),200,200);
        imgView.setImageBitmap(bm);
หรือจะให้แสดงตามขนาดของ ImageView สามารถใช้ Code นี้
	 public static void decodeFile(ImageView imgView, String filePath){
		int targetW = imgView.getWidth();
		int targetH = imgView.getHeight();

		// Get the dimensions of the bitmap
		BitmapFactory.Options bmOptions = new BitmapFactory.Options();
		bmOptions.inJustDecodeBounds = true;
		BitmapFactory.decodeFile(filePath, bmOptions);
		int photoW = bmOptions.outWidth;
		int photoH = bmOptions.outHeight;

		// Determine how much to scale down the image
		int scaleFactor = Math.min(photoW/targetW, photoH/targetH);

		// Decode the image file into a Bitmap sized to fill the View
		bmOptions.inJustDecodeBounds = false;
		bmOptions.inSampleSize = scaleFactor;
		bmOptions.inPurgeable = true;

		Bitmap bitmap = BitmapFactory.decodeFile(filePath, bmOptions);
		imgView.setImageBitmap(bitmap);
	}
	    ImageView imgView = (ImageView) findViewById(R.id.imgView);
	    decodeFile(imgView,"/sdcard/image.jpg");
|
 ช่วยกันสนับสนุนรักษาเว็บไซต์ความรู้แห่งนี้ไว้ด้วยการสนับสนุน Source Code 2.0 ของทีมงานไทยครีเอท ช่วยกันสนับสนุนรักษาเว็บไซต์ความรู้แห่งนี้ไว้ด้วยการสนับสนุน Source Code 2.0 ของทีมงานไทยครีเอท
|
|
| |
By : |
ThaiCreate.Com Team (บทความเป็นลิขสิทธิ์ของเว็บไทยครีเอทห้ามนำเผยแพร่ ณ เว็บไซต์อื่น ๆ) |
| |
Score Rating : |
 |
|
| |
Create/Update Date : |
2015-11-16 15:55:50 /
2017-03-26 21:08:14 |
| |
Download : |
No files |
|
|
Sponsored Links / Related |
|
|
|
|
|
|

|


