Android Taking Photo and Upload file to Server (PHP/Upload) |
Android Taking Photo and Upload file to Server (PHP/Upload) ในหัวข้อนี้จะเป็นการประยุกต์การเขียน Android เพื่อเปิดกล้องและถ่ายภาพ โดยนำรูปภาพที่ได้จัดเก็บลงใน Storage (SD Card) และสามารถ Upload ไฟล์ที่ได้นั้นไปจัดเก็บบน Web Server ด้วย ซึ่งเราจะใช้ชุดคำสั่งของ HttpPost ส่งค่า Post ไปยัง Web Server ผ่าน HTTP และ PHP ที่ฝั่ง Web Server จะมีหน้าที่คอยรับค่ารูปภาพที่ส่งจาก Android App ไปจัดเก็บไว้ในโฟเดอร์ที่ต้องการ
 Android Taking Photo and Upload file to Server (PHP/Upload)
การเปิดกล้อง Camera ถ่ายรูปและ Capture รูปภาพ
        	    Intent takePictureIntent = new Intent(MediaStore.ACTION_IMAGE_CAPTURE);
        	    // Ensure that there's a camera activity to handle the intent
        	    if (takePictureIntent.resolveActivity(getPackageManager()) != null) {
        	        // Create the File where the photo should go
        	        File photoFile = null;
        	        try {
        	            photoFile = createImageFile();
        	        } catch (IOException ex) {}
        	        // Continue only if the File was successfully created
        	        if (photoFile != null) {
        	            takePictureIntent.putExtra(MediaStore.EXTRA_OUTPUT,
        	                    Uri.fromFile(photoFile));
        	            startActivityForResult(takePictureIntent, REQUEST_TAKE_PHOTO);
        	        }
        	    }
หลังจากถ่ายภาพเสร็จแล้วจะใช้การสร้างรูปภาพและจัดเก็บลงใน Storage SD Card
	private File createImageFile() throws IOException {
	    // Create an image file name
	    String timeStamp = new SimpleDateFormat("yyyyMMdd_HHmmss").format(new Date());
	    String imageFileName = "JPEG_" + timeStamp + "_";
	    File storageDir = new File(strSDCardPathName);
	    File image = File.createTempFile(
	        imageFileName,  /* prefix */
	        ".jpg",         /* suffix */
	        storageDir      /* directory */
	    );

	    // Save a file: path for use with ACTION_VIEW intents
	    mCurrentPhotoPath = image.getAbsolutePath();
	    return image;
	}
สามารถกำหนด Path ได้จาก Environment.getExternalStorageDirectory()
static String strSDCardPathName = Environment.getExternalStorageDirectory() + "/temp_picture" + "/";
การ Upload ไฟล์ไปยัง Web Server
		final Button btnUpload = (Button) findViewById(R.id.btnUpload);
		// Perform action on click
		btnUpload.setOnClickListener(new View.OnClickListener() {
			public void onClick(View v) {
				// *** Upload file to Server
				uploadFiletoServer(mCurrentPhotoPath, strURLUpload);
			}
		});
ชุดคำสั่งสำหรับการ Upload
	public static boolean uploadFiletoServer(String strSDPath, String strUrlServer) {

		int bytesRead, bytesAvailable, bufferSize;
		byte[] buffer;
		int maxBufferSize = 1 * 1024 * 1024;
		int resCode = 0;
		String resMessage = "";

		String lineEnd = "\r\n";
		String twoHyphens = "--";
		String boundary = "*****";

		try {
			File file = new File(strSDPath);
			if (!file.exists()) {
				return false;
			}

			FileInputStream fileInputStream = new FileInputStream(new File(strSDPath));

			URL url = new URL(strUrlServer);
			HttpURLConnection conn = (HttpURLConnection) url.openConnection();
			conn.setDoInput(true);
			conn.setDoOutput(true);
			conn.setUseCaches(false);
			conn.setRequestMethod("POST");

			conn.setRequestProperty("Connection", "Keep-Alive");
			conn.setRequestProperty("Content-Type", "multipart/form-data;boundary=" + boundary);

			DataOutputStream outputStream = new DataOutputStream(conn.getOutputStream());
			outputStream.writeBytes(twoHyphens + boundary + lineEnd);
			outputStream.writeBytes(
					"Content-Disposition: form-data; name=\"filUpload\";filename=\"" + strSDPath + "\"" + lineEnd);
			outputStream.writeBytes(lineEnd);

			bytesAvailable = fileInputStream.available();
			bufferSize = Math.min(bytesAvailable, maxBufferSize);
			buffer = new byte[bufferSize];

			// Read file
			bytesRead = fileInputStream.read(buffer, 0, bufferSize);

			while (bytesRead > 0) {
				outputStream.write(buffer, 0, bufferSize);
				bytesAvailable = fileInputStream.available();
				bufferSize = Math.min(bytesAvailable, maxBufferSize);
				bytesRead = fileInputStream.read(buffer, 0, bufferSize);
			}

			outputStream.writeBytes(lineEnd);
			outputStream.writeBytes(twoHyphens + boundary + twoHyphens + lineEnd);

			// Response Code and Message
			resCode = conn.getResponseCode();
			if (resCode == HttpURLConnection.HTTP_OK) {
				InputStream is = conn.getInputStream();
				ByteArrayOutputStream bos = new ByteArrayOutputStream();

				int read = 0;
				while ((read = is.read()) != -1) {
					bos.write(read);
				}
				byte[] result = bos.toByteArray();
				bos.close();

				resMessage = new String(result);

			}

			fileInputStream.close();
			outputStream.flush();
			outputStream.close();

			return true;

		} catch (Exception ex) {
			// Exception handling
			return false;
		}
	}
และในฝั่งของ Web Server ซึ่งจะใช้ PHP เป็นตัวรับไฟล์
uploadFile.php (PHP)
<?php
if(@move_uploaded_file($_FILES["filUpload"]["tmp_name"],"myFolder/".$_FILES["filUpload"]["name"]))
{
	$arr["StatusID"] = "1";
	$arr["Error"] = "";
}
else
{
	$arr["StatusID"] = "0";
	$arr["Error"] = "Error cannot upload file.";
}

echo json_encode($arr);
?>
โดยจะ Upload ลงไนโฟเดอร์ myFolder
ในการเรียกใช้งาน Camera และ Save ลงใน Storage (SD Card) , Internet จะต้องกำหนด Permission และ Feature ดังนี้
AndroidManifest.xml
    <uses-permission android:name="android.permission.INTERNET" />

	<uses-permission android:name="android.permission.CAMERA" />
 	<uses-feature android:name="android.hardware.camera" android:required="true" />
    <uses-feature android:name="android.hardware.camera.autofocus" />

    <uses-permission android:name="android.permission.WRITE_EXTERNAL_STORAGE" />
Example ตัวอย่างการเขียน Android เพื่อเปิดกล้องถ่ายรูปและ Capture รูปภาพ และ การ Upload รูปภาพไปยัง Web Server
")
โครงสร้างของไฟล์ในโปรเจคสามารถใช้ได้ทั้งบน Eclipse และ Android Studio
")
activity_main.xml
<TableLayout xmlns:android="http://schemas.android.com/apk/res/android"
    android:id="@+id/tableLayout1"
    android:layout_width="fill_parent"
    android:layout_height="fill_parent">

   	<TableRow
      android:id="@+id/tableRow1"
      android:layout_width="wrap_content"
      android:layout_height="wrap_content" >

     <TextView
        android:id="@+id/textView1"
        android:layout_width="wrap_content"
        android:layout_height="wrap_content"
        android:gravity="center"
        android:text="Camera Take Photo "
        android:layout_span="1"
        android:textAppearance="?android:attr/textAppearanceLarge" />

 	</TableRow>

	<View
		android:layout_height="1dip"
		android:background="#CCCCCC" />

  <TableLayout
      android:layout_width="fill_parent"
      android:layout_height="wrap_content"
      android:layout_weight="0.1"
      android:orientation="horizontal" >


      <ImageView
          android:id="@+id/imgView"
          android:layout_width="wrap_content"
          android:layout_height="wrap_content"
          android:layout_weight="0.75"
          android:src="@drawable/ic_launcher" />

      <Button
          android:id="@+id/btnTakePhoto"
          android:layout_width="wrap_content"
          android:layout_height="wrap_content"
          android:text="Take Photo" />
        <Button
          android:id="@+id/btnUpload"
          android:layout_width="wrap_content"
          android:layout_height="wrap_content"
          android:text="Upload Photo" />
  </TableLayout>

	<View
		android:layout_height="1dip"
		android:background="#CCCCCC" />

   	<LinearLayout
      android:id="@+id/LinearLayout1"
      android:layout_width="wrap_content"
      android:layout_height="wrap_content"
      android:padding="5dip" >

   		<TextView
   		    android:id="@+id/textView2"
   		    android:layout_width="wrap_content"
   		    android:layout_height="wrap_content"
   		    android:text="By.. ThaiCreate.Com" />

	</LinearLayout>

</TableLayout>
ไฟล์ Java
MainActivity.java
package com.myapp;

import android.os.Bundle;
import android.os.Environment;
import android.os.StrictMode;
import android.provider.MediaStore;

import java.io.ByteArrayOutputStream;
import java.io.DataOutputStream;
import java.io.File;
import java.io.FileInputStream;
import java.io.IOException;
import java.io.InputStream;
import java.net.HttpURLConnection;
import java.net.URL;
import java.text.SimpleDateFormat;
import java.util.Date;

import android.app.Activity;
import android.content.Intent;
import android.graphics.Bitmap;
import android.graphics.BitmapFactory;
import android.net.Uri;
import android.view.View;
import android.view.Menu;
import android.widget.Button;
import android.widget.ImageView;

public class MainActivity extends Activity {

	ImageView imgView;
	static final int REQUEST_TAKE_PHOTO = 1;
	String mCurrentPhotoPath;

	static String strSDCardPathName = Environment.getExternalStorageDirectory() + "/temp_picture" + "/";
	static String strURLUpload = "https://www.thaicreate.com/android/uploadFile.php";

	@Override
	public void onCreate(Bundle savedInstanceState) {
		super.onCreate(savedInstanceState);
		setContentView(R.layout.activity_main);

        // Permission StrictMode
        if (android.os.Build.VERSION.SDK_INT > 9) {
            StrictMode.ThreadPolicy policy = new StrictMode.ThreadPolicy.Builder().permitAll().build();
            StrictMode.setThreadPolicy(policy);
        }

		// *** Create Folder
		createFolder();

		// *** ImageView
		imgView = (ImageView) findViewById(R.id.imgView);

		// *** Take Photo
		final Button btnTakePhoto = (Button) findViewById(R.id.btnTakePhoto);
		// Perform action on click
		btnTakePhoto.setOnClickListener(new View.OnClickListener() {
			public void onClick(View v) {

				Intent takePictureIntent = new Intent(MediaStore.ACTION_IMAGE_CAPTURE);
				// Ensure that there's a camera activity to handle the intent
				if (takePictureIntent.resolveActivity(getPackageManager()) != null) {
					// Create the File where the photo should go
					File photoFile = null;
					try {
						photoFile = createImageFile();
					} catch (IOException ex) {
					}
					// Continue only if the File was successfully created
					if (photoFile != null) {
						takePictureIntent.putExtra(MediaStore.EXTRA_OUTPUT, Uri.fromFile(photoFile));
						startActivityForResult(takePictureIntent, REQUEST_TAKE_PHOTO);
					}
				}

			}
		});

		// *** Upload Photo
		final Button btnUpload = (Button) findViewById(R.id.btnUpload);
		// Perform action on click
		btnUpload.setOnClickListener(new View.OnClickListener() {
			public void onClick(View v) {
				// *** Upload file to Server
				uploadFiletoServer(mCurrentPhotoPath, strURLUpload);
			}
		});

	}

	private File createImageFile() throws IOException {
		// Create an image file name
		String timeStamp = new SimpleDateFormat("yyyyMMdd_HHmmss").format(new Date());
		String imageFileName = "JPEG_" + timeStamp + "_";
		File storageDir = new File(strSDCardPathName);
		File image = File.createTempFile(imageFileName, /* prefix */
				".jpg", /* suffix */
				storageDir /* directory */
		);

		// Save a file: path for use with ACTION_VIEW intents
		mCurrentPhotoPath = image.getAbsolutePath();
		return image;
	}

	@Override
	protected void onActivityResult(int requestCode, int resultCode, Intent data) {
		if (resultCode == RESULT_OK) {
			Bitmap bitmap = BitmapFactory.decodeFile(mCurrentPhotoPath);
			imgView.setImageBitmap(bitmap);
		}
	}

	public static boolean uploadFiletoServer(String strSDPath, String strUrlServer) {

		int bytesRead, bytesAvailable, bufferSize;
		byte[] buffer;
		int maxBufferSize = 1 * 1024 * 1024;
		int resCode = 0;
		String resMessage = "";

		String lineEnd = "\r\n";
		String twoHyphens = "--";
		String boundary = "*****";

		try {
			File file = new File(strSDPath);
			if (!file.exists()) {
				return false;
			}

			FileInputStream fileInputStream = new FileInputStream(new File(strSDPath));

			URL url = new URL(strUrlServer);
			HttpURLConnection conn = (HttpURLConnection) url.openConnection();
			conn.setDoInput(true);
			conn.setDoOutput(true);
			conn.setUseCaches(false);
			conn.setRequestMethod("POST");

			conn.setRequestProperty("Connection", "Keep-Alive");
			conn.setRequestProperty("Content-Type", "multipart/form-data;boundary=" + boundary);

			DataOutputStream outputStream = new DataOutputStream(conn.getOutputStream());
			outputStream.writeBytes(twoHyphens + boundary + lineEnd);
			outputStream.writeBytes(
					"Content-Disposition: form-data; name=\"filUpload\";filename=\"" + strSDPath + "\"" + lineEnd);
			outputStream.writeBytes(lineEnd);

			bytesAvailable = fileInputStream.available();
			bufferSize = Math.min(bytesAvailable, maxBufferSize);
			buffer = new byte[bufferSize];

			// Read file
			bytesRead = fileInputStream.read(buffer, 0, bufferSize);

			while (bytesRead > 0) {
				outputStream.write(buffer, 0, bufferSize);
				bytesAvailable = fileInputStream.available();
				bufferSize = Math.min(bytesAvailable, maxBufferSize);
				bytesRead = fileInputStream.read(buffer, 0, bufferSize);
			}

			outputStream.writeBytes(lineEnd);
			outputStream.writeBytes(twoHyphens + boundary + twoHyphens + lineEnd);

			// Response Code and Message
			resCode = conn.getResponseCode();
			if (resCode == HttpURLConnection.HTTP_OK) {
				InputStream is = conn.getInputStream();
				ByteArrayOutputStream bos = new ByteArrayOutputStream();

				int read = 0;
				while ((read = is.read()) != -1) {
					bos.write(read);
				}
				byte[] result = bos.toByteArray();
				bos.close();

				resMessage = new String(result);

			}

			fileInputStream.close();
			outputStream.flush();
			outputStream.close();

			return true;

		} catch (Exception ex) {
			// Exception handling
			return false;
		}
	}

	public static void createFolder() {
		File folder = new File(strSDCardPathName);
		try {
			// Create folder
			if (!folder.exists()) {
				folder.mkdir();
			}
		} catch (Exception ex) {
		}

	}

	@Override
	public boolean onCreateOptionsMenu(Menu menu) {
		getMenuInflater().inflate(R.menu.main, menu);
		return true;
	}

}
Screenshot
")
หน้าแรกของ App ให้คลิกที่ Take Photo
")
โปรแกรมจะ Intent ไปยัง App ที่ทำหน้าที่ถ่ายรูป และเปิด Camera
")
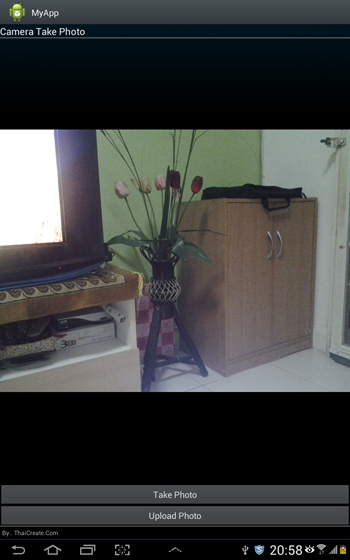
หลังจากที่ถ่ายรูปเสร็จแล้วโปรแกรมจะถามว่าต้องการ Save รูปนี้หรือไม่
เมื่อกด Save ภาพถ่ายจะถูกจัดเก็บลงใน Storage ตามโฟเดอร์ที่กำหนด และแสดงผลบน ImageView พร้อมกับคลิกที่ Upload Photo
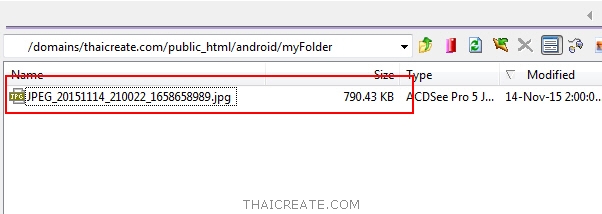
ไฟล์จะถูก Upload มายัง Web Server ตามที่สั่ง PHP ได้จัดเก็บลงในโฟเดอร์ "myFolder"
.
|
 ช่วยกันสนับสนุนรักษาเว็บไซต์ความรู้แห่งนี้ไว้ด้วยการสนับสนุน Source Code 2.0 ของทีมงานไทยครีเอท ช่วยกันสนับสนุนรักษาเว็บไซต์ความรู้แห่งนี้ไว้ด้วยการสนับสนุน Source Code 2.0 ของทีมงานไทยครีเอท
|
|
| |
By : |
ThaiCreate.Com Team (บทความเป็นลิขสิทธิ์ของเว็บไทยครีเอทห้ามนำเผยแพร่ ณ เว็บไซต์อื่น ๆ) |
| |
Score Rating : |
 |
|
| |
Create/Update Date : |
2015-11-16 15:56:15 /
2017-03-26 21:09:43 |
| |
Download : |
No files |
|
|
Sponsored Links / Related |
|
|
|
|
|
|

|


