ตอนที่ 9 : การทำ Authentication in Azure Mobile Services ด้วย Android |
ตอนที่ 9 : การทำ Authentication in Azure Mobile Services ด้วย Android ถ้าเคยใช้พวก App บน Mobile บ่อย ๆ เราอาจจะเคยเห็นว่า App บางตัวสามารถที่จะติดต่อกับ Social Network พวก Twitter , Facebook หรือ Google Account ได้ เช่นการโพสข้อความ หรือการแสดงข้อมูลต่าง ๆ จาก Social Network ที่เรา Login ในเครื่องนั้น ได้ และบน Mobile Services ของ Windows Azure ก็สามารถที่จะทำการเชื่อมต่อไปยัง Social Network เหล่านั้นได้เช่นเดียวกัน โดยในปัจจุบันของรับ 4 ตัวด้วยกันคือ
- Microsoft Account
- Facebook login
- Twitter login
- Google login
ในการเขียน Mobile Services เพื่อทำการ Authentication Account จาก Social และ Provider เหล่านี้ เราจะต้องทำการ Register เพื่อขอพวก ID จาก Provider นั้น ๆ ก่อน

ตอนนี้เรามี Mobile Services ทีได้สร้างไว้ก่อนหน้านี้แล้ว 1 ตัว

หน้าจอ Dashboard ของ Mobile Services จะมี URL ของ Mobile Services อยู่ ซึ่งเราจะต้องเอา URL นี้ไปทำการ Register กับ Social ของค่ายนั้น ๆ ก่อน

หน้าจอสำหรับการกำหนด ID ของ Social แต่ล่ะค่าย
ลงทะบียนของแต่ล่ะค่ายได้ตาม Link นี้
Example ในตัวอย่างนี้เราจะกำหนดว่าจะต้อง Login ผ่าน Social Provider ของ Google ก่อนถึงจะสามารถดูข้อมูลได้

ให้ไปที่ DATA เลือก Table ที่ต้องการ
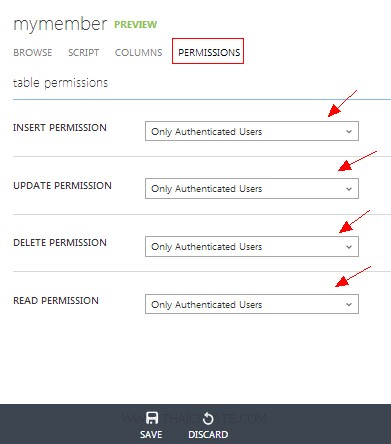
ในส่วนของ PERMISSIONS ให้เลือกเป็นแบบ Only Authenticateds Users
จากนั้นในส่วนของ Code สามารถที่จะเขียนดักการ Authentication ด้วยคำสั่งง่าย ๆ นี้
        mClient.login(MobileServiceAuthenticationProvider.Google,
                new UserAuthenticationCallback() {

                    @Override
                    public void onCompleted(MobileServiceUser user,
                            Exception exception, ServiceFilterResponse response) {
                        if (exception == null) {

                            Toast.makeText(MainActivity.this,String.format(
                                    "You are now logged in - %1$2s",
                                    user.getUserId()) ,Toast.LENGTH_LONG).show();

                            getData(); // Get Data When Login Success

                        } else {

                        	AlertDialog ad = adb.create();
                        	ad.setMessage("You must log in. Login Required");
                        	ad.show();
                        }
                    }
                });
มาดูตัวอย่างการทำ Authentication ผ่าน Google provider

โครงสร้างไฟล์ทั้งหมด
activity_main.xml
<?xml version="1.0" encoding="utf-8"?>
<LinearLayout xmlns:android="http://schemas.android.com/apk/res/android"
      android:orientation="horizontal"
      android:layout_width="fill_parent"
      android:layout_height="wrap_content"
      android:layout_weight="0.1">

   <ListView
       android:id="@+id/listView1"
       android:layout_width="match_parent"
       android:layout_height="wrap_content">
   </ListView>

</LinearLayout>
activity_column.xml
<LinearLayout xmlns:android="http://schemas.android.com/apk/res/android"
	android:id="@+id/linearLayout1"
	android:layout_width="fill_parent"
	android:layout_height="fill_parent" >

	<TextView
	android:id="@+id/col_id"
		android:layout_width="0dp"
		android:layout_height="wrap_content"
		android:layout_weight="1"
		android:text="id"/>

	<TextView
		android:id="@+id/col_name"
		android:layout_width="0dp"
		android:layout_height="wrap_content"
		android:layout_weight="1"
		android:text="name"/>

	<TextView
	    android:id="@+id/col_email"
	    android:layout_width="0dp"
	    android:layout_height="wrap_content"
	    android:layout_weight="2"
	    android:text="email" />

</LinearLayout>
MyMember.java
package com.example.thaicreate;

public class MyMember {

	@com.google.gson.annotations.SerializedName("id")
	private int mId;

	@com.google.gson.annotations.SerializedName("name")
	private String mName;

	@com.google.gson.annotations.SerializedName("email")
	private String mEmail;

	public MyMember() {
		// empty
	}

	public MyMember(String name, String email) {
		this.setName(name);
		this.setEmail(email);
	}

	public int getId() {
		return mId;
	}

	public final void setName(String name) {
		mName = name;
	}
	public String getName() {
		return mName;
	}

	public final void setEmail(String email) {
		mEmail = email;
	}
	public String getEmail() {
		return mEmail;
	}

}
MainActivity.java
package com.example.thaicreate;

import java.net.MalformedURLException;
import java.util.List;

import android.app.Activity;
import android.app.AlertDialog;
import android.content.Context;
import android.os.Bundle;
import android.util.Log;
import android.view.LayoutInflater;
import android.view.Menu;
import android.view.View;
import android.view.ViewGroup;
import android.widget.ArrayAdapter;
import android.widget.ListView;
import android.widget.TextView;
import android.widget.Toast;

import com.microsoft.windowsazure.mobileservices.MobileServiceClient;
import com.microsoft.windowsazure.mobileservices.MobileServiceTable;
import com.microsoft.windowsazure.mobileservices.ServiceFilterResponse;
import com.microsoft.windowsazure.mobileservices.TableQueryCallback;
import com.microsoft.windowsazure.mobileservices.MobileServiceUser;
import com.microsoft.windowsazure.mobileservices.MobileServiceAuthenticationProvider;
import com.microsoft.windowsazure.mobileservices.UserAuthenticationCallback;

public class MainActivity extends Activity {

	private MobileServiceClient mClient;
	private MobileServiceTable<MyMember> mMyMember;
	private MyMemberAdapter mAdapter;

    @Override
    public void onCreate(Bundle savedInstanceState) {
        super.onCreate(savedInstanceState);
        setContentView(R.layout.activity_main);


        /*** Create to Mobile Services ***/
        try {
			mClient = new MobileServiceClient(
				      "https://thaicreate.azure-mobile.net/",
				      "QUjngFknhHZjdaGgYAAzdoXkOzKoxi24",
				      this);

		} catch (MalformedURLException e) {
			// TODO Auto-generated catch block
			e.printStackTrace();
		}


        final AlertDialog.Builder adb = new AlertDialog.Builder(this);

        // Login using the Google provider.
        mClient.login(MobileServiceAuthenticationProvider.Google,
                new UserAuthenticationCallback() {

                    @Override
                    public void onCompleted(MobileServiceUser user,
                            Exception exception, ServiceFilterResponse response) {
                        if (exception == null) {

                            Toast.makeText(MainActivity.this,String.format(
                                    "You are now logged in - %1$2s",
                                    user.getUserId()) ,Toast.LENGTH_LONG).show();

                            getData(); // Get Data When Login Success

                        } else {

                        	AlertDialog ad = adb.create();
                        	ad.setMessage("You must log in. Login Required");
                        	ad.show();
                        }
                    }
                });

    }

    private void getData()
    {

        /*** Create getTable ***/
        mMyMember = mClient.getTable(MyMember.class);

        // listView1
        final ListView lstView1 = (ListView)findViewById(R.id.listView1);
        mAdapter = new MyMemberAdapter(this,R.layout.activity_column);
        lstView1.setAdapter(mAdapter);

        refreshItemsFromTable();
    }

	private void refreshItemsFromTable() {

		mMyMember.execute(new TableQueryCallback<MyMember>() {
			public void onCompleted(List<MyMember> result, int count, Exception exception, ServiceFilterResponse response) {

				if (exception == null) {
					mAdapter.clear();
					for (MyMember item : result) {
						mAdapter.add(item);
					}
				} else {
					Log.d("Error","Error Load Data from Mobile Service");
				}
			}
		});
	}


	public class MyMemberAdapter extends ArrayAdapter<MyMember> {
		Context mContext;
		int mLayoutResourceId;

		public MyMemberAdapter(Context context, int layoutResourceId) {
			super(context, layoutResourceId);

			mContext = context;
			mLayoutResourceId = layoutResourceId;
		}

		@Override
		public View getView(int position, View convertView, ViewGroup parent) {
			View row = convertView;

			final MyMember currentItem = getItem(position);

			if (row == null) {
				LayoutInflater inflater = ((Activity) mContext).getLayoutInflater();
				row = inflater.inflate(mLayoutResourceId, parent, false);
			}

			row.setTag(currentItem);

			// Column id
			final TextView txt_id = (TextView) row.findViewById(R.id.col_id);
			txt_id.setText(String.valueOf(currentItem.getId()));

			// Column name
			final TextView txt_name = (TextView) row.findViewById(R.id.col_name);
			txt_name.setText(currentItem.getName());

			// Column email
			final TextView txt_email = (TextView) row.findViewById(R.id.col_email);
			txt_email.setText(currentItem.getEmail());

			return row;
		}
	}


    @Override
    public boolean onCreateOptionsMenu(Menu menu) {
        getMenuInflater().inflate(R.menu.activity_main, menu);
        return true;
    }

}
Screenshot

กรณีที่ Login แล้ว Authen ผ่านก็จะแสดงข้อมูล

กรณีที่ Authen ไม่ผ่าน
บทความถัดไปที่แนะนำให้อ่าน
บทความที่เกี่ยวข้อง
บทความเพิ่มเติมที่แนะนำให้อ่าน

Authentication with Android and Windows Azure Mobile Services
|


