ตอนที่ 3 : ASP.Net เพื่อติดต่อกับฐานข้อมูล MySQL Database บน Azure |
ตอนที่ 3 : ASP.Net เพื่อติดต่อกับฐานข้อมูล MySQL Database บน Azure บน Web Site ของ Windows Azure เมื่อทการสร้าง Service Web Site เราสามารถที่จะสร้าง MySQL Database มาพร้อมกับ Web Site และสามารถเขียน Application ได้ทั้ง php , java และ asp.net ที่จะเรียกใช้ฐานข้อมูลของ MySQL และถ้าใช้ ASP.Net จะแนะนำให้ใช้ Connector ของ MySqlConnection ด้วยการ Import Library ที่ชื่อว่า MySql.Data.dll เพื่อเข้ามาจัดการกับการเชื่อมต่อระหว่าง ASP.Net และ MySQL โดยสามารถทำการเชื่อมต่อได้กับหลากหลาย Application ที่พัฒนาด้วย .Net Framework ไม่จำเป็นจะต้องเป็น ASP.Net เท่านั้น
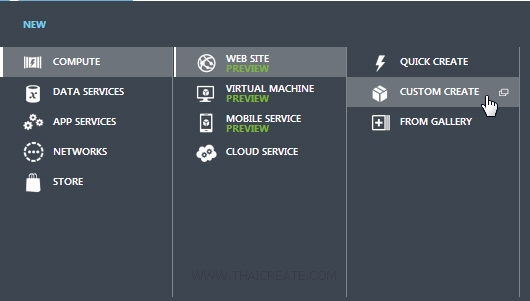
เริ่มต้นด้วยการสร้าง Web Site ด้วยการคลิกที่ NEW -> COMPUTE -> WEB SITE -> CUSTOM CREATE
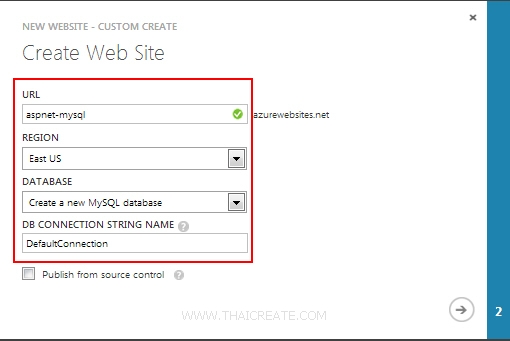
กรอก URL ของ Web Site พร้อมกับคลิกเลือก Create a new MySQL Database
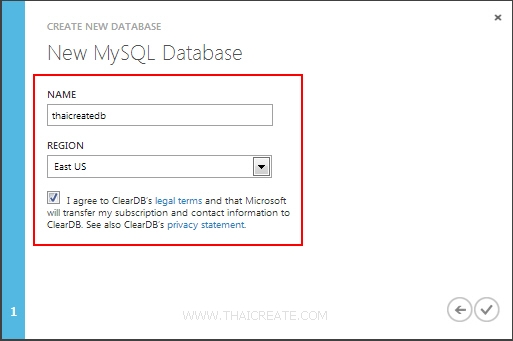
กรอกชื่อ Database และทำตามขั้นตอนถัดไป

จากนั้นรอซะครู่ เราก็จะได้เว็บไซต์ขึ้นมา ตามที่ได้สร้างไว้
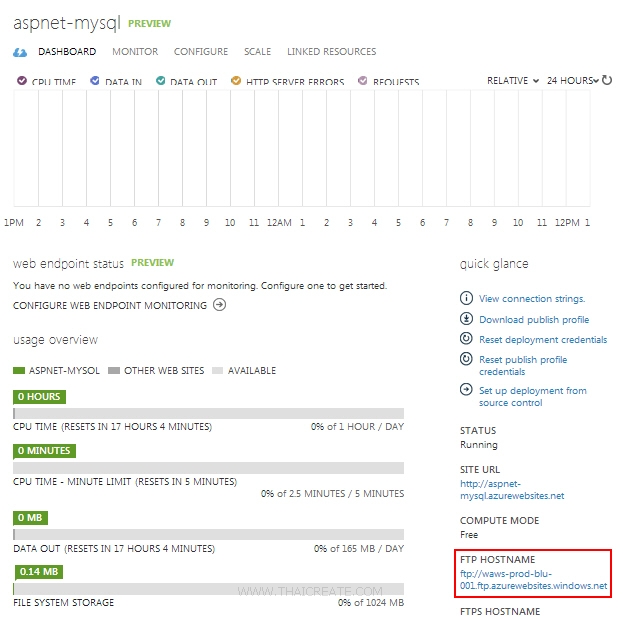
ในหน้า Dashboard ของ Web Site แสดงรายละเอียดต่าง ๆ

ให้คลิกที่ LINK RESOURCES จะแสดงรายการของ MySQL Database ที่ได้ถูกสร้างพร้อมกับ Web Site
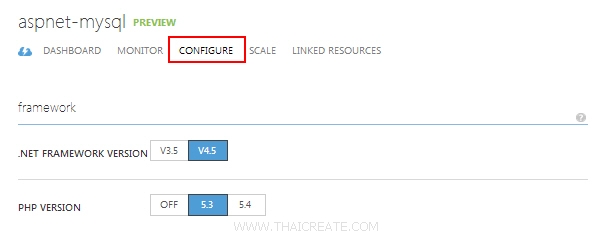
ให้คลิกที่ CONFIGURE

คลิกที่ Show Connection String เพื่อแสดง Connection String ของ MySQL

แสดง Connection String ของ MySQL
Database=thaicreatedb;Data Source=us-cdbr-azure-east-b.cloudapp.net;User Id=bb32255693798e;Password=48a226a7
เราสามารถใช้โปรแกรมสำหรับการจัดการกับ MySQL เข้าไปจัดการได้เช่น MySQL Workbench
อ่านเพิ่มเติม
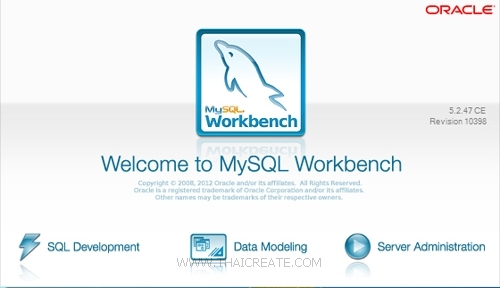
MySQL Workbench สำหรับจัดการกับ MySQL Database บน Windows Azure

ให้สร้างตารางและข้อมูลดังรูป
USE thaicreatedb;

CREATE TABLE `customer` (
  `CustomerID` varchar(4) NOT NULL,
  `Name` varchar(50) NOT NULL,
  `Email` varchar(50) NOT NULL,
  `CountryCode` varchar(2) NOT NULL,
  `Budget` double NOT NULL,
  `Used` double NOT NULL,
  PRIMARY KEY  (`CustomerID`)
) ENGINE=MyISAM;


INSERT INTO `customer` VALUES ('C001', 'Win Weerachai', '[email protected]', 'TH', 1000000, 600000);
INSERT INTO `customer` VALUES ('C002', 'John  Smith', '[email protected]', 'UK', 2000000, 800000);
INSERT INTO `customer` VALUES ('C003', 'Jame Bond', '[email protected]', 'US', 3000000, 600000);
INSERT INTO `customer` VALUES ('C004', 'Chalee Angel', '[email protected]', 'US', 4000000, 100000);
จากนั้นกลับมาที่ ASP.Net เพื่อสร้าง Project สำหรับเรียกใช้ฐานข้อมูล MySQL ตามที่ได้เกริ่นไว้เราจะใช้ Connector ของ MySQLConnection ด้วยการเรียกใช้ Library ของ MySql.Data.dll ด้วยการ Import Library ผ่านการ Add Reference เฉพาะฉะนั้นผมเลือกที่จะเขียนในรูปแบบของ Code Behind ผ่าน Tools ของ Visual Studio
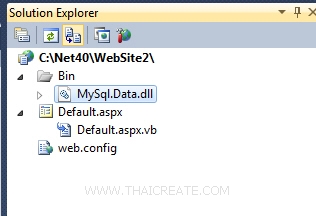
ตัวอย่างการสร้าง Project บน Visual Studio และการ Add Reference ของ MySql.Data.dll และเชื่อต่อผ่าน Conenction String นี้
Server=us-cdbr-azure-east-b.cloudapp.net;User Id=bb32255693798e; Password=48a226a7; Database=thaicreatedb; Pooling=false
อ่านเพิ่มเติม
Default.aspx
<%@ Page Language="VB" AutoEventWireup="false" CodeFile="Default.aspx.vb" Inherits="_Default" %>

<!DOCTYPE html PUBLIC "-//W3C//DTD XHTML 1.0 Transitional//EN" "http://www.w3.org/TR/xhtml1/DTD/xhtml1-transitional.dtd">

<html xmlns="http://www.w3.org/1999/xhtml">
<head runat="server">
    <title>ThaiCreate.Com</title>
</head>
<body>
    <form id="form1" runat="server">
<asp:Repeater id="myRepeater" runat="server">
	<HeaderTemplate>
		<table border="1">
			<tr>
				<th>CustomerID</th>
				<th>Name</th>
				<th>Email</th>
				<th>CountryCode</th>
				<th>Budget</th>
				<th>Used</th>
			</tr>
	</HeaderTemplate>
	<ItemTemplate>
		<tr>
			<td align="center"><asp:Label id="lblCustomerID" runat="server" Text='<%#Container.DataItem("CustomerID") %>'></asp:Label></td>
			<td><asp:Label id="lblName" runat="server" Text='<%#Container.DataItem("Name") %>'></asp:Label></td>
			<td><asp:Label id="lblEmail" runat="server" Text='<%#Container.DataItem("Email") %>'></asp:Label></td>
			<td align="center"><asp:Label id="lblCountryCode" runat="server" Text='<%#Container.DataItem("CountryCode") %>'></asp:Label></td>
			<td align="right"><asp:Label id="lblBudget" runat="server" Text='<%#Container.DataItem("Budget") %>'></asp:Label></td>
			<td align="right"><asp:Label id="lblUsed" runat="server" Text='<%#Container.DataItem("Used") %>'></asp:Label></td>
		</tr>
	</ItemTemplate>
	<AlternatingItemTemplate>
		<tr bgcolor="#e8e8e8">
			<td align="center"><asp:Label id="lblCustomerID" runat="server" Text='<%#Container.DataItem("CustomerID") %>'></asp:Label></td>
			<td><asp:Label id="lblName" runat="server" Text='<%#Container.DataItem("Name") %>'></asp:Label></td>
			<td><asp:Label id="lblEmail" runat="server" Text='<%#Container.DataItem("Email") %>'></asp:Label></td>
			<td align="center"><asp:Label id="lblCountryCode" runat="server" Text='<%#Container.DataItem("CountryCode") %>'></asp:Label></td>
			<td align="right"><asp:Label id="lblBudget" runat="server" Text='<%#Container.DataItem("Budget") %>'></asp:Label></td>
			<td align="right"><asp:Label id="lblUsed" runat="server" Text='<%#Container.DataItem("Used") %>'></asp:Label></td>
		</tr>
	</AlternatingItemTemplate>
	</asp:Repeater>
    </form>
</body>
</html>
Default.aspx.vb
Imports MySql.Data.MySqlClient

Partial Class _Default
    Inherits System.Web.UI.Page

    Dim objConn As MySqlConnection
    Dim objCmd As MySqlCommand

    Protected Sub Page_Load(sender As Object, e As System.EventArgs) Handles Me.Load

        Dim strConnString As String
        strConnString = "Server=us-cdbr-azure-east-b.cloudapp.net;User Id=bb32255693798e; Password=48a226a7; Database=thaicreatedb; Pooling=false"
        objConn = New MySqlConnection(strConnString)
        objConn.Open()

        BindData()

    End Sub

    Sub BindData()
        Dim strSQL As String
        strSQL = "SELECT * FROM customer"

        Dim dtReader As MySqlDataReader
        objCmd = New MySqlCommand(strSQL, objConn)
        dtReader = objCmd.ExecuteReader()

        '*** BindData to Repeater ***'
        myRepeater.DataSource = dtReader
        myRepeater.DataBind()

        dtReader.Close()
        dtReader = Nothing

    End Sub

    Protected Sub Page_Unload(sender As Object, e As System.EventArgs) Handles Me.Unload
        objConn.Close()
        objConn = Nothing
    End Sub

End Class
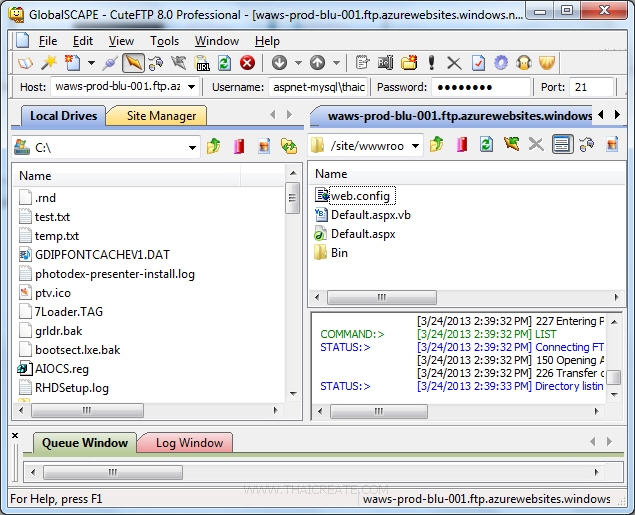
จากนั้นให้ Publish ผ่าน FTP หรือ Git ไปยัง Web Site บน Windows Azure
อ่านเพิ่มเติม
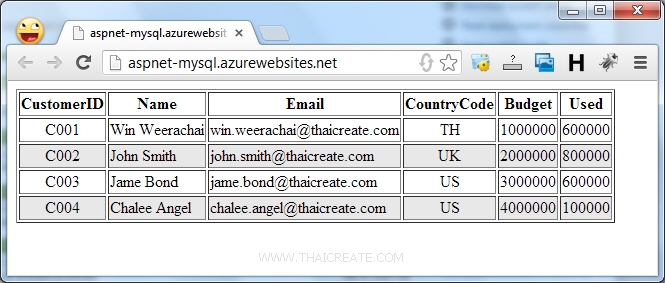
ทดสอบการทำงาน Web Site บน Windows Azure จะเห็นว่า ASP.Net สามารถที่จะอ่านข้อมูลของ MySQL มาแสดงในหน้า Web Page ได้แล้ว ส่วนรายละเอียดการใช้งานอื่น ๆ สามารถอ่านได้จากบทความ ASP.Net กับ MySql ที่ได้แนะนำไว้ก่อนหน้าที่
อ่านเพิ่มเติม
|
 ช่วยกันสนับสนุนรักษาเว็บไซต์ความรู้แห่งนี้ไว้ด้วยการสนับสนุน Source Code 2.0 ของทีมงานไทยครีเอท ช่วยกันสนับสนุนรักษาเว็บไซต์ความรู้แห่งนี้ไว้ด้วยการสนับสนุน Source Code 2.0 ของทีมงานไทยครีเอท
|
|
| |
By : |
ThaiCreate.Com Team (บทความเป็นลิขสิทธิ์ของเว็บไทยครีเอทห้ามนำเผยแพร่ ณ เว็บไซต์อื่น ๆ) |
| |
Score Rating : |
    |
|
| |
Create/Update Date : |
2013-03-25 10:04:15 /
2017-03-24 10:21:50 |
| |
Download : |
No files |
|
|
Sponsored Links / Related |
|
|
|
|
|
|

|